Copyright © ViserLab 2024
ViserBank is a digital banking software that comes with PHP Laravel. It’s developed for those people who want to start their Digital Banking Business.
The documentation will help to understand the total system and we have tried to summarize the total.
If needed, we will update this script continuously and come with new features and security patches. We will try to give the best user experience to all of our clients.
Thank you for purchasing ViserBank. If you have any questions or queries that are not answered in this document, please feel free to contact us via email. We will try to respond to you as soon as possible. Thank you so much.

Do I need VPS or a Dedicated server to run this system?
No, You can run this system in a shared host as well and it will run smoothly. But if you have much traffic, you may need to upgrade your server/hosting. Our codes are highly optimized to ensure the best possible performance.
Which hosting provider should I choose for this? Do you have any suggestions?
You can choose any hosting provider that provides cPanel-based hosting. cPanel is not a must, but we recommend you to have cPanel-based hosting.
I don't have cPanel, What should I do?
Nothing to worry about, Our system will work with any control panel but cPanel is easy to manage, for that we recommend cPanel-based hosting. Also, Our free Support is limited to cPanel-based hosting only.
Do you provide hosting as well?
Yes, We do. We can provide a complete solution for your hosting. We can provide budget shared hosting, premium shared hosting, VPS, Dedicated servers, and Cluster from various geolocation. Please contact us for more details.
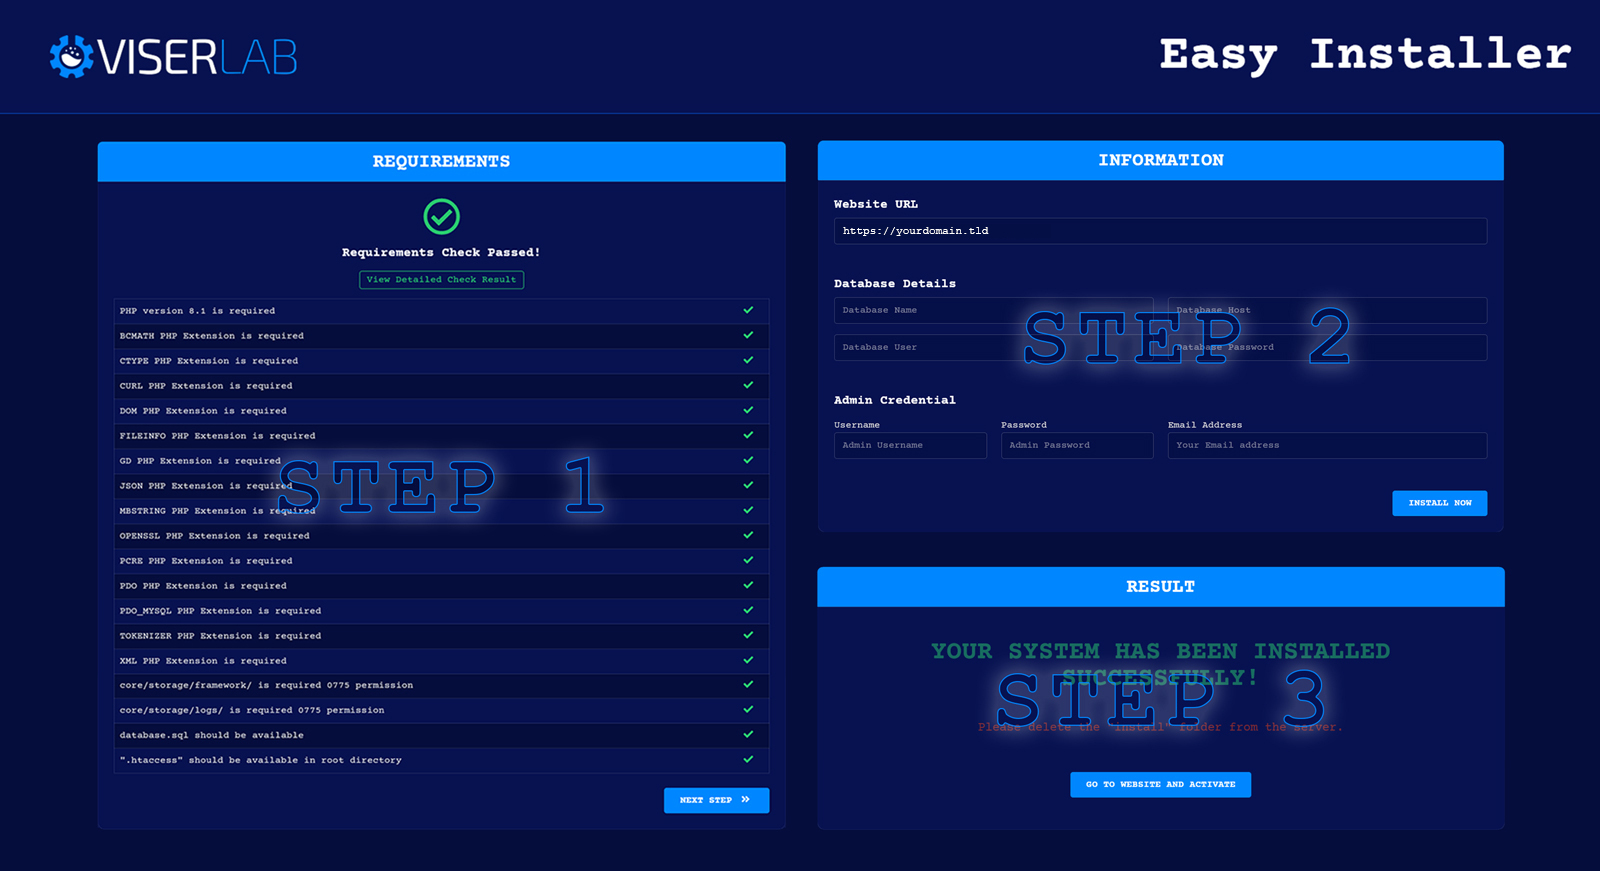
Installation is very easy with our Easy Installer. You can install yourself simply in few steps without any coding knowledge. We develop our installation system to make the installation process flawless and easy.
Installation Steps:
Upload the whole file to the server you have downloaded from download after purchase.
Extract/Unzip the file and move all files in the Files folder to the main
folder(where you want to install it). Make sure you have moved the index.php and
.htaccess as well.
Now please browse http://your-site-url/install/index.php and follow
the process. Your system should be ready to use.
If you are still unable to install the system, please contact us. we offer free installation in cPanel-based hosting.
Admin Login:
your-site-url/admin
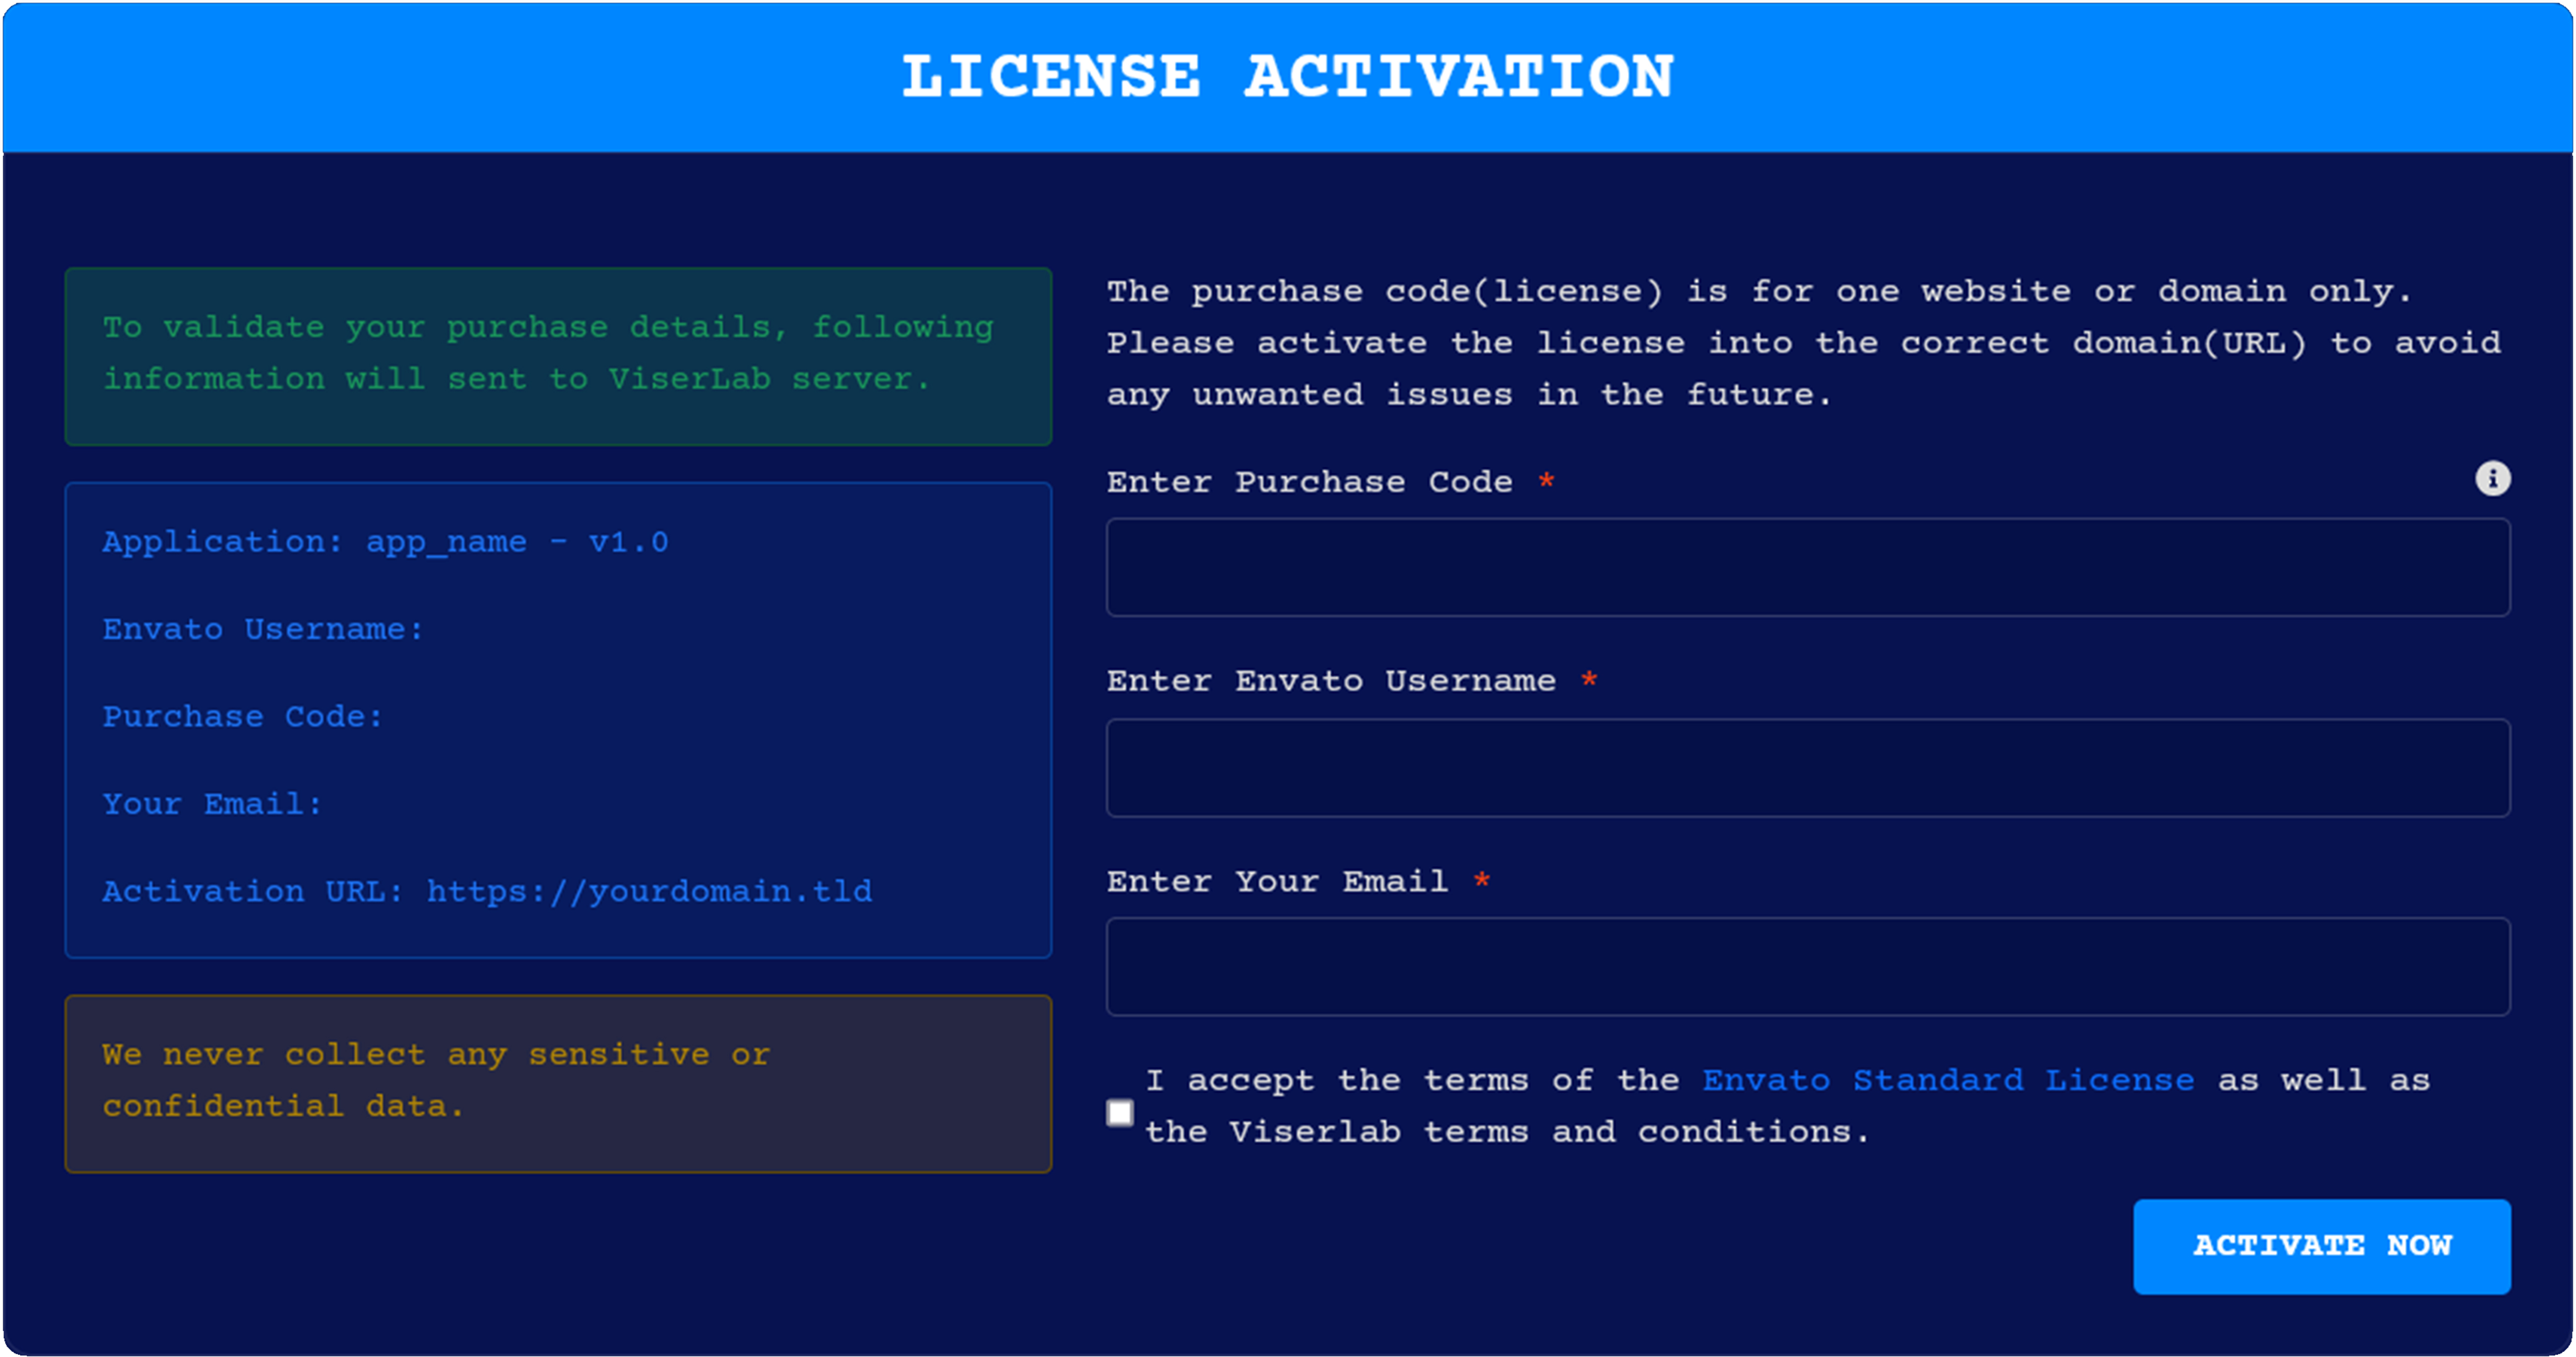
After installing the system you need to activate it. When you visit the system, you will be able to see the activation page. Just provide this information to activate and run your system. Your provided information will send to ViserLab server to verify and we never collect any sensitive or confidential data.
Purchase Code: To get purchase code Click Here.
Envato Username: Your Envato username with which you bought system.
Email: Provide your email for further communication.
The purchase code(license) is for one website or domain only. Please activate the license into the correct domain(URL) to avoid any unwanted issues in the future.
After installation, There will be two folders and two files will be in your main folder.
On the "assets" folder, We keep all kinds of assets like CSS, JS, Images. If you want To edit or change anything over CSS or js, please have a look at this folder.
On the "core" folder, We keep the core of Laravel and we maintain full MVC structure on this project.
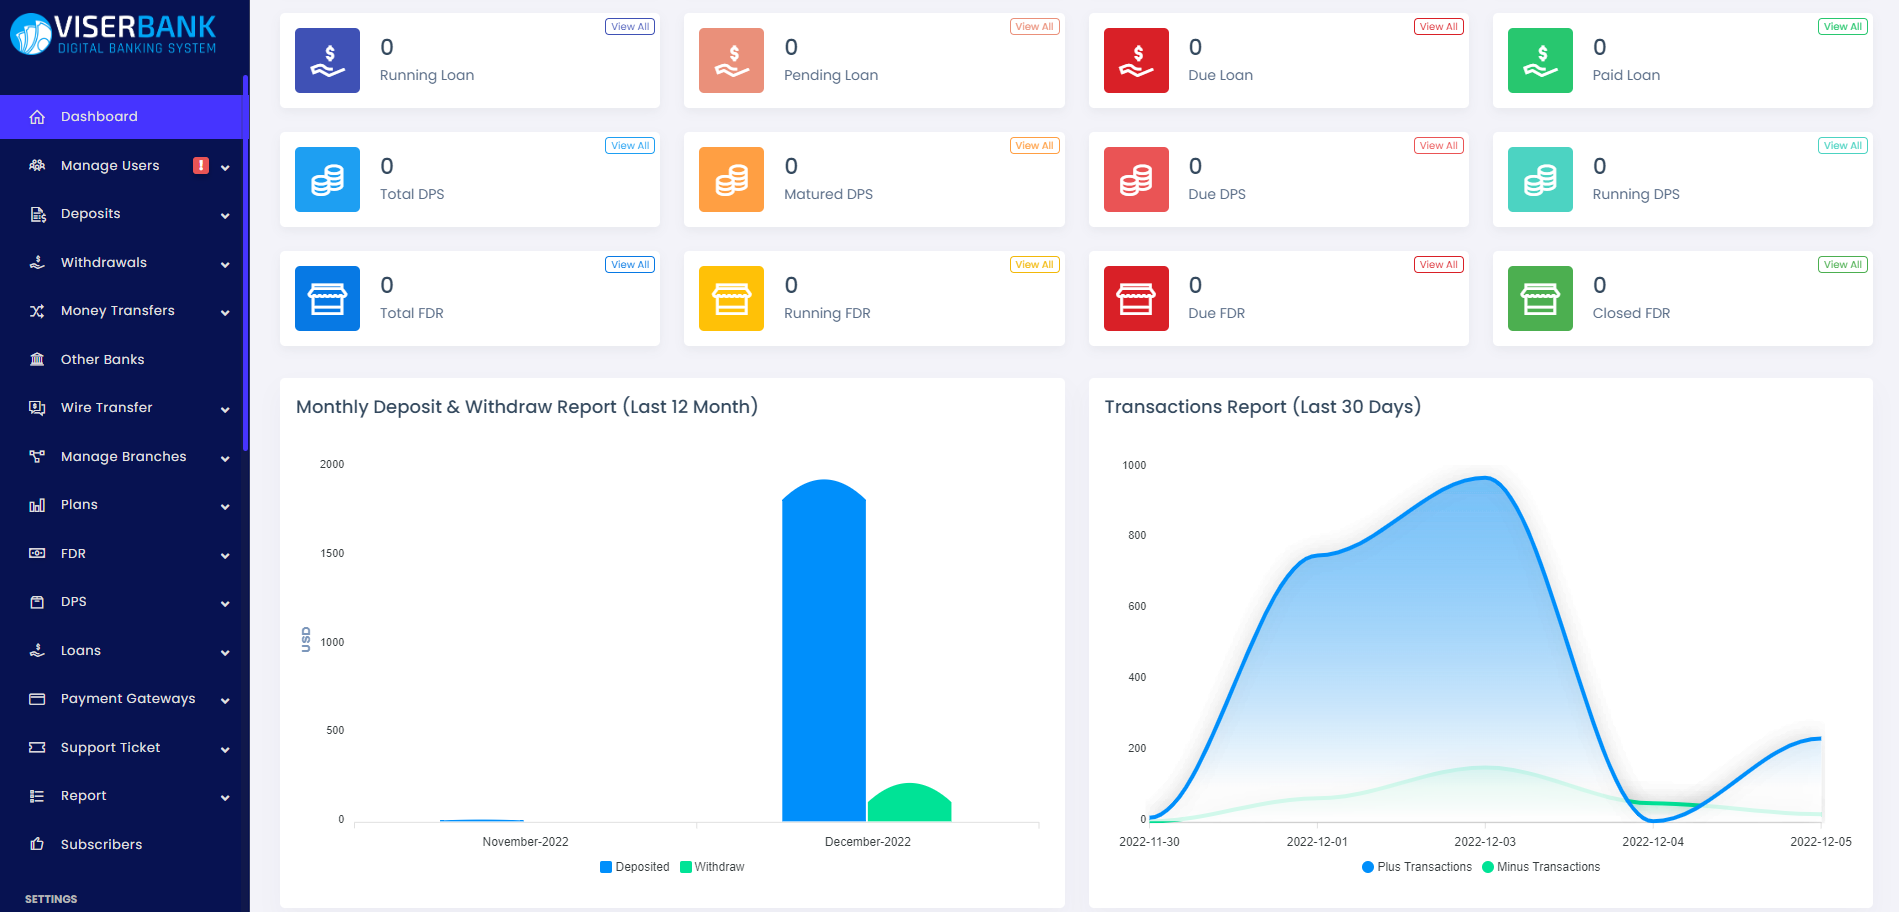
From the Dashboard menu, you will get an overview at a glance. You may know about the users' info, pending & rejected deposits, pending and rejected withdrawals, loan info, FDR info, and DPS info. Also, you may see the deposit & withdrawal report in the chart.
You'll see a popup window here about the cron-job instruction. You need to configure cron job commands given on that window on your server to automate the payment process of FDR, DPS & loan installment.
Users refer to the account holder of your bank. Users may get registered online or offline from a branch. Users are able to do deposits, withdraw, open DPS, open FDR, apply for loans, and transfer money after login into their dashboard.
From the Manage User menu, you can see the users list of Active Users, Banned Users, Email Unverified Users, Mobile Unverified Users, KYC Unverified Users, and KYC Pending Users. You can manage your users like update their information, notifying them, viewing their login history, and banning them from the system from their details page. Also, you can send notifications to all users or to a specific user.
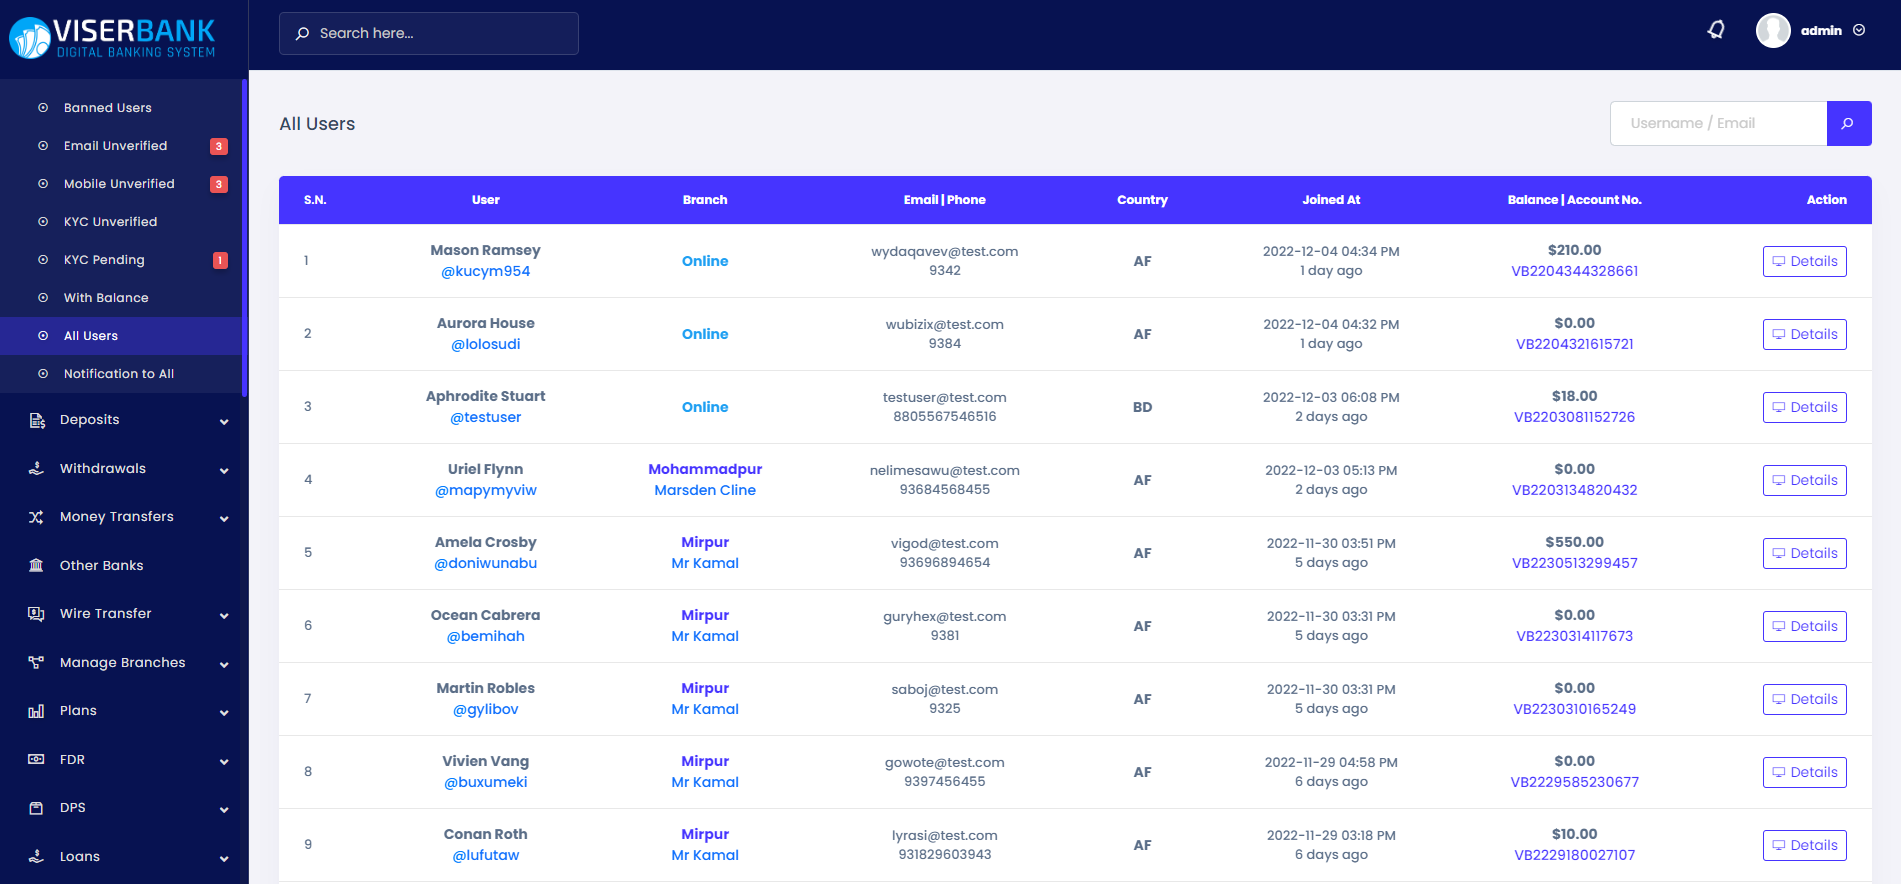
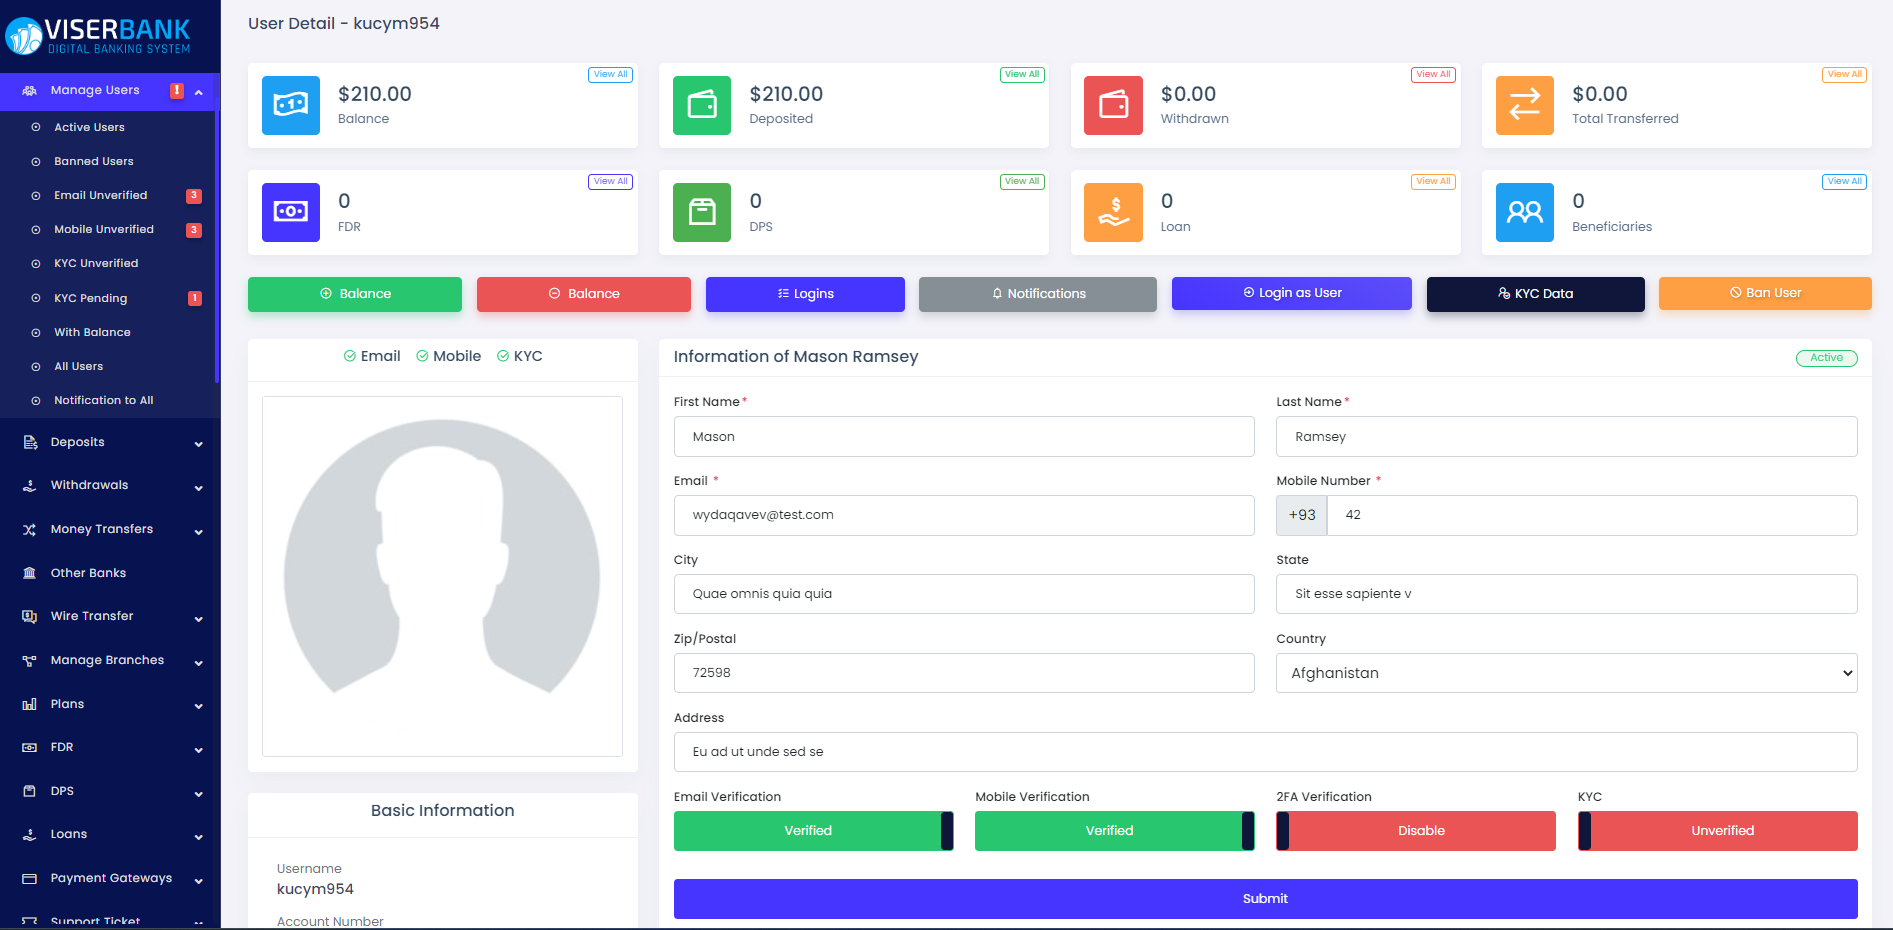
On the user details page you can get an Overview of the user info like balance, deposited amount, withdrawn amount, transferred amount, how many opened, how many DPS opened, how many loans, and how many beneficiaries added.
Admin is able to update the user information and can add/subtract balance, view login history, ban the users from this details page, and see the documents submitted by the user for KYC verification.
Email Verification: If email verification is unverified then a
verification
code will be sent to the user's email if he/she tries to log in and need to be verified by that
code.
Mobile Verification: If mobile verification is unverified then a verification
code will be sent to the user's mobile if he/she tries to login and need to be verified by that
code.
2FA Verification: This will be enabled if the user enables the 2FA security from their
user panel. If this is enabled the user needs to verify the code from his google authentication
app to get access to his user panel.
KYC: If KYC is unverified, the user needs to submit the information configured from the
KYC Setting.
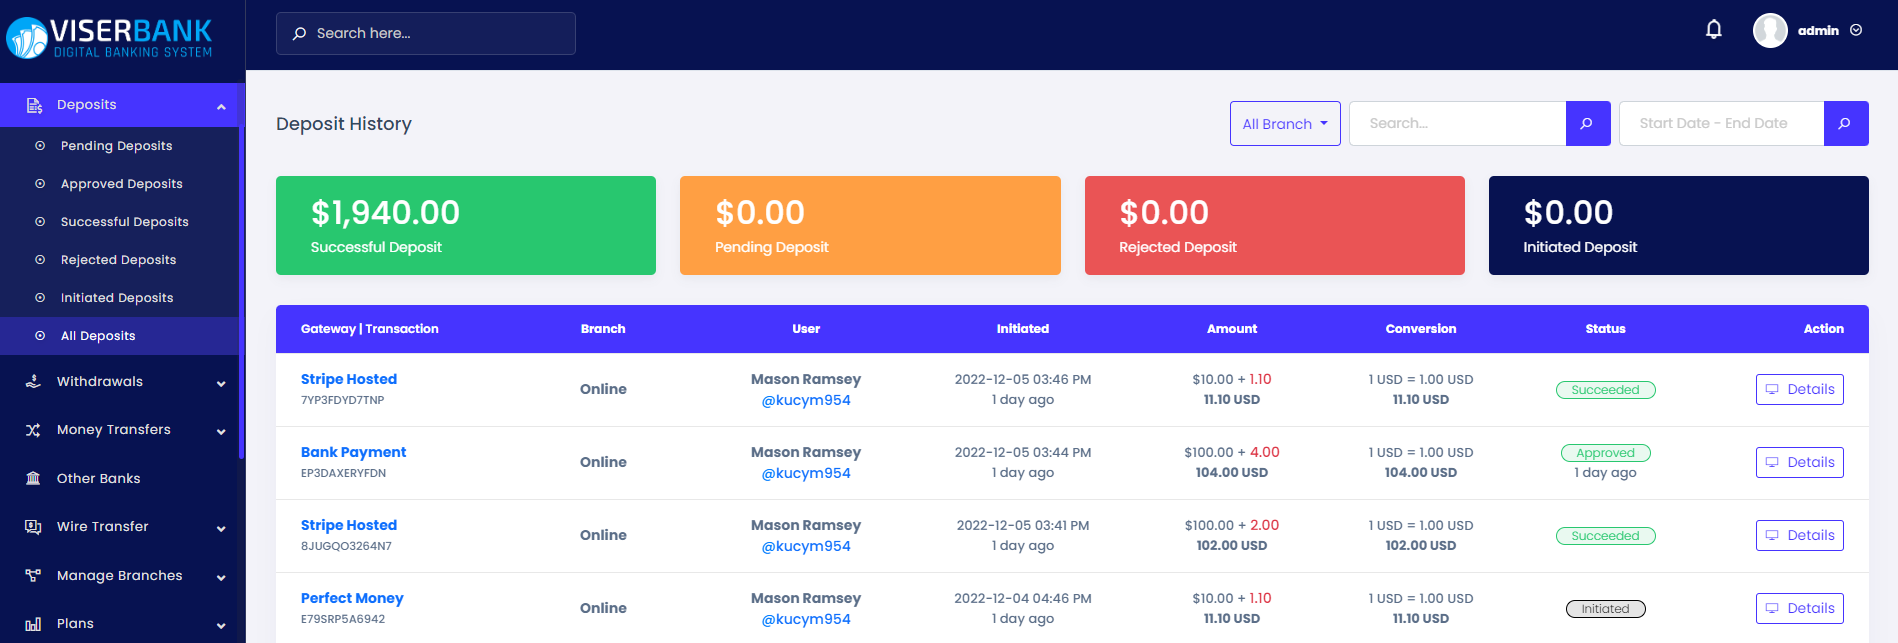
From the Deposits menu, the admin can see the deposit history and details. If a deposit is done by a manual payment gateway, then its status will be pending at first. Admin can approve or reject the pending deposits from the details page.
Admin is able to filter the deposit history by branch, date, date to date, and username or transaction number.
From the search field, the admin can search the deposit data by Transaction Number or username of the user.
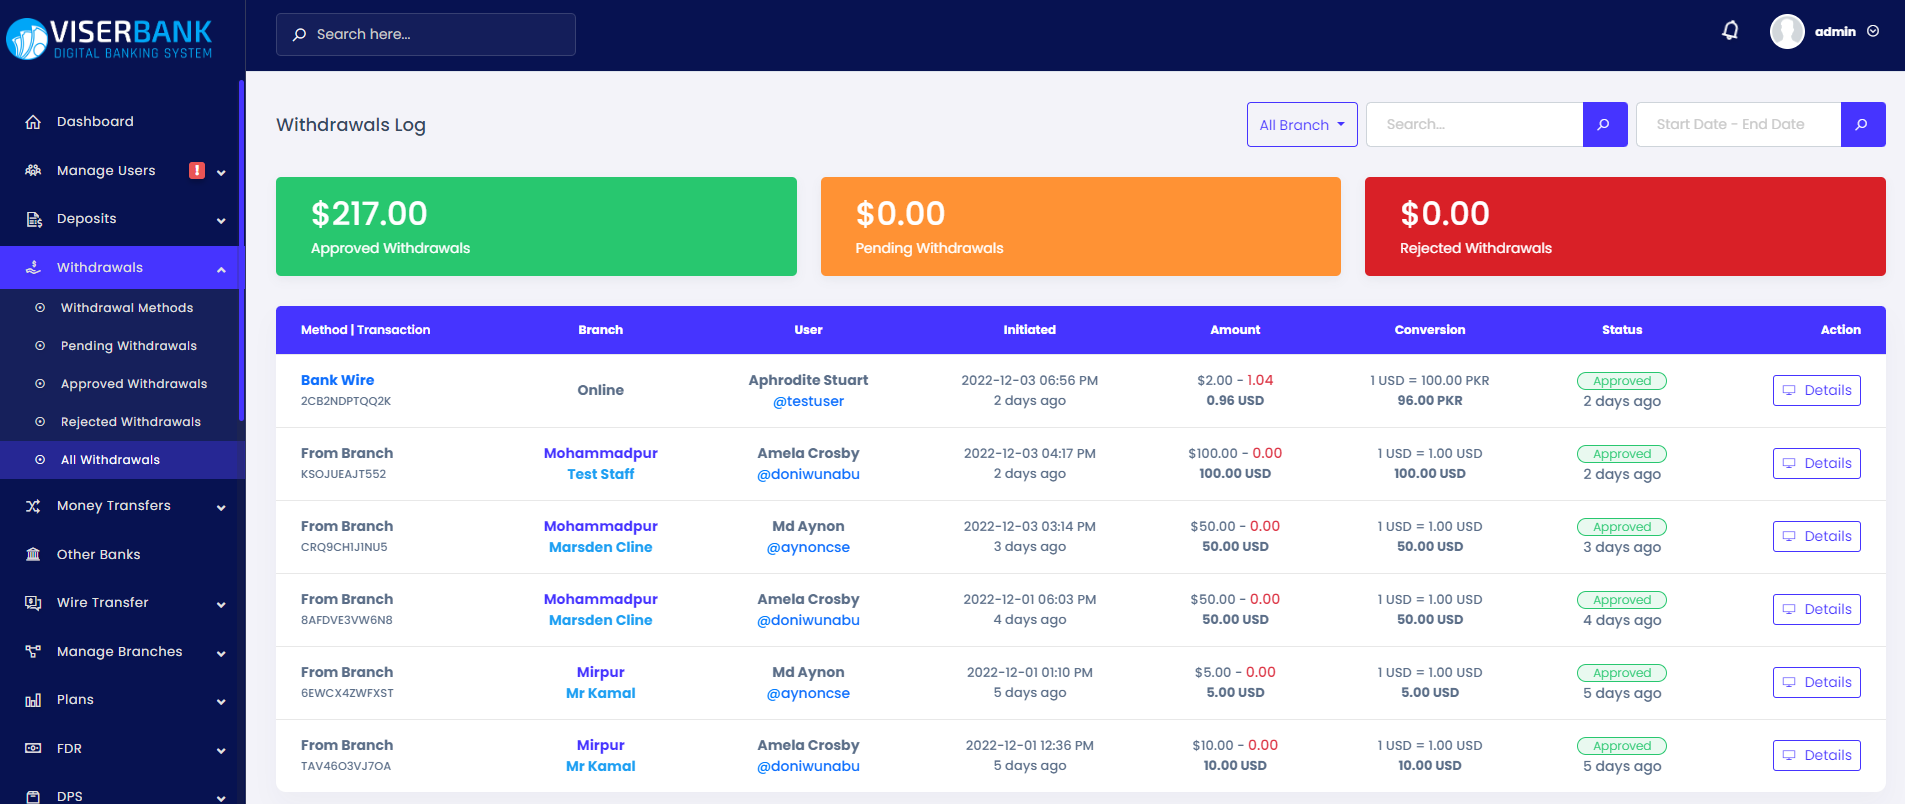
From the Withdrawals menu, the admin can see the Withdrawal history and details. As our withdrawal procedure is manual, Admin can approve or reject the pending withdrawals from the details page.
Admin is able to filter the withdrawal history by branch, date, date to date, and username or transaction number.
From the search field, the admin can search the withdrawal data by Transaction Number or username of the user.
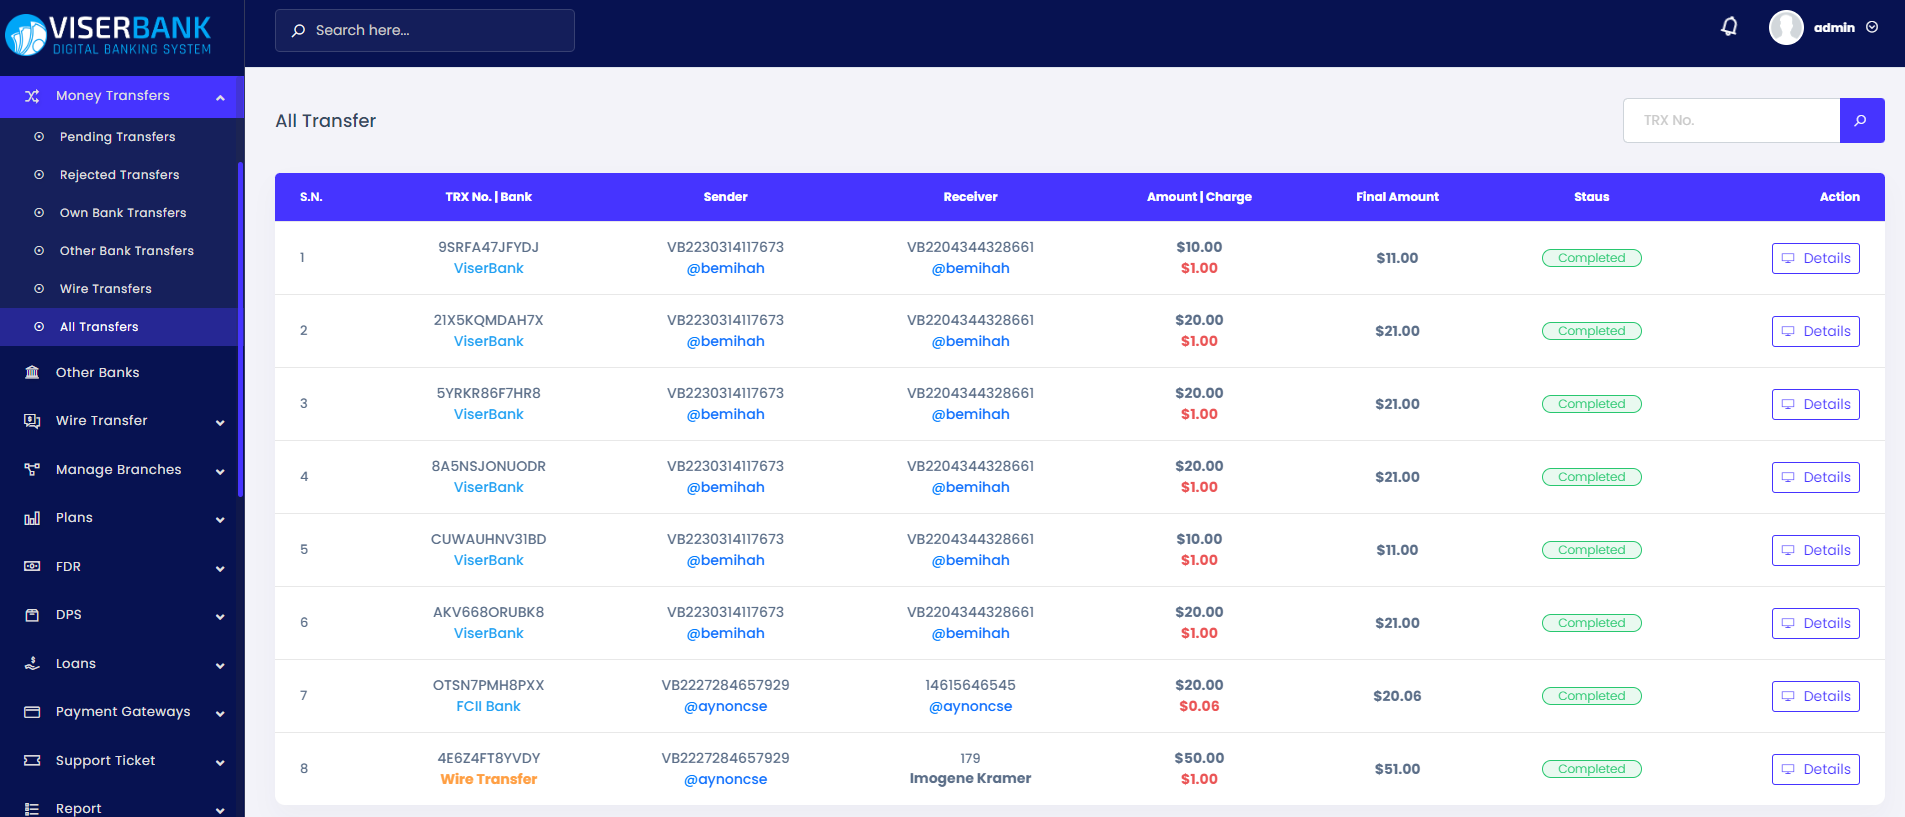
From the Money Transfers menu, the admin can see the Transfer history and details. Admin can approve or reject the pending transfers from the details page.
From the search field, the admin can search the transfer data by Transaction Number or username of the sender.
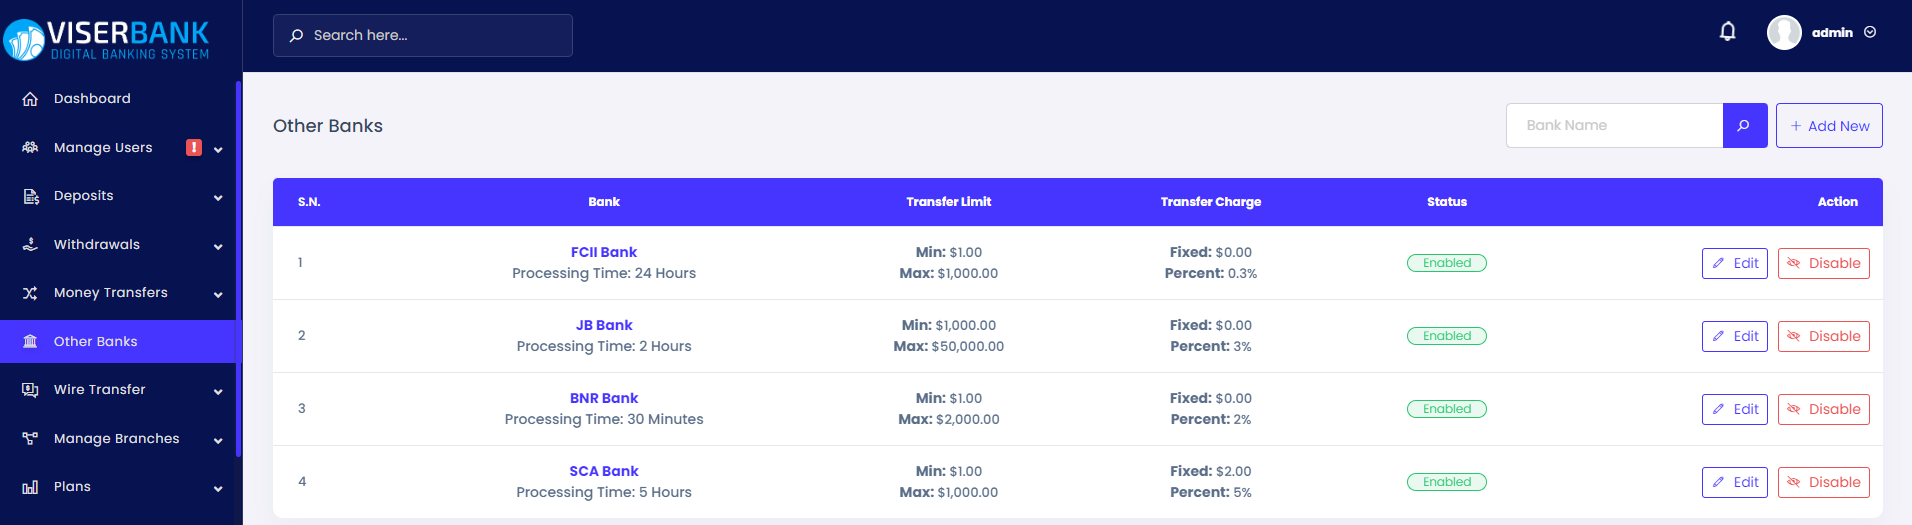
From the Other Banks menu, the admin can see the list of other banks and add new banks or update from the list. Admin can approve or reject the pending transfers from the details page.
From the search field, the admin can search a bank by its name.
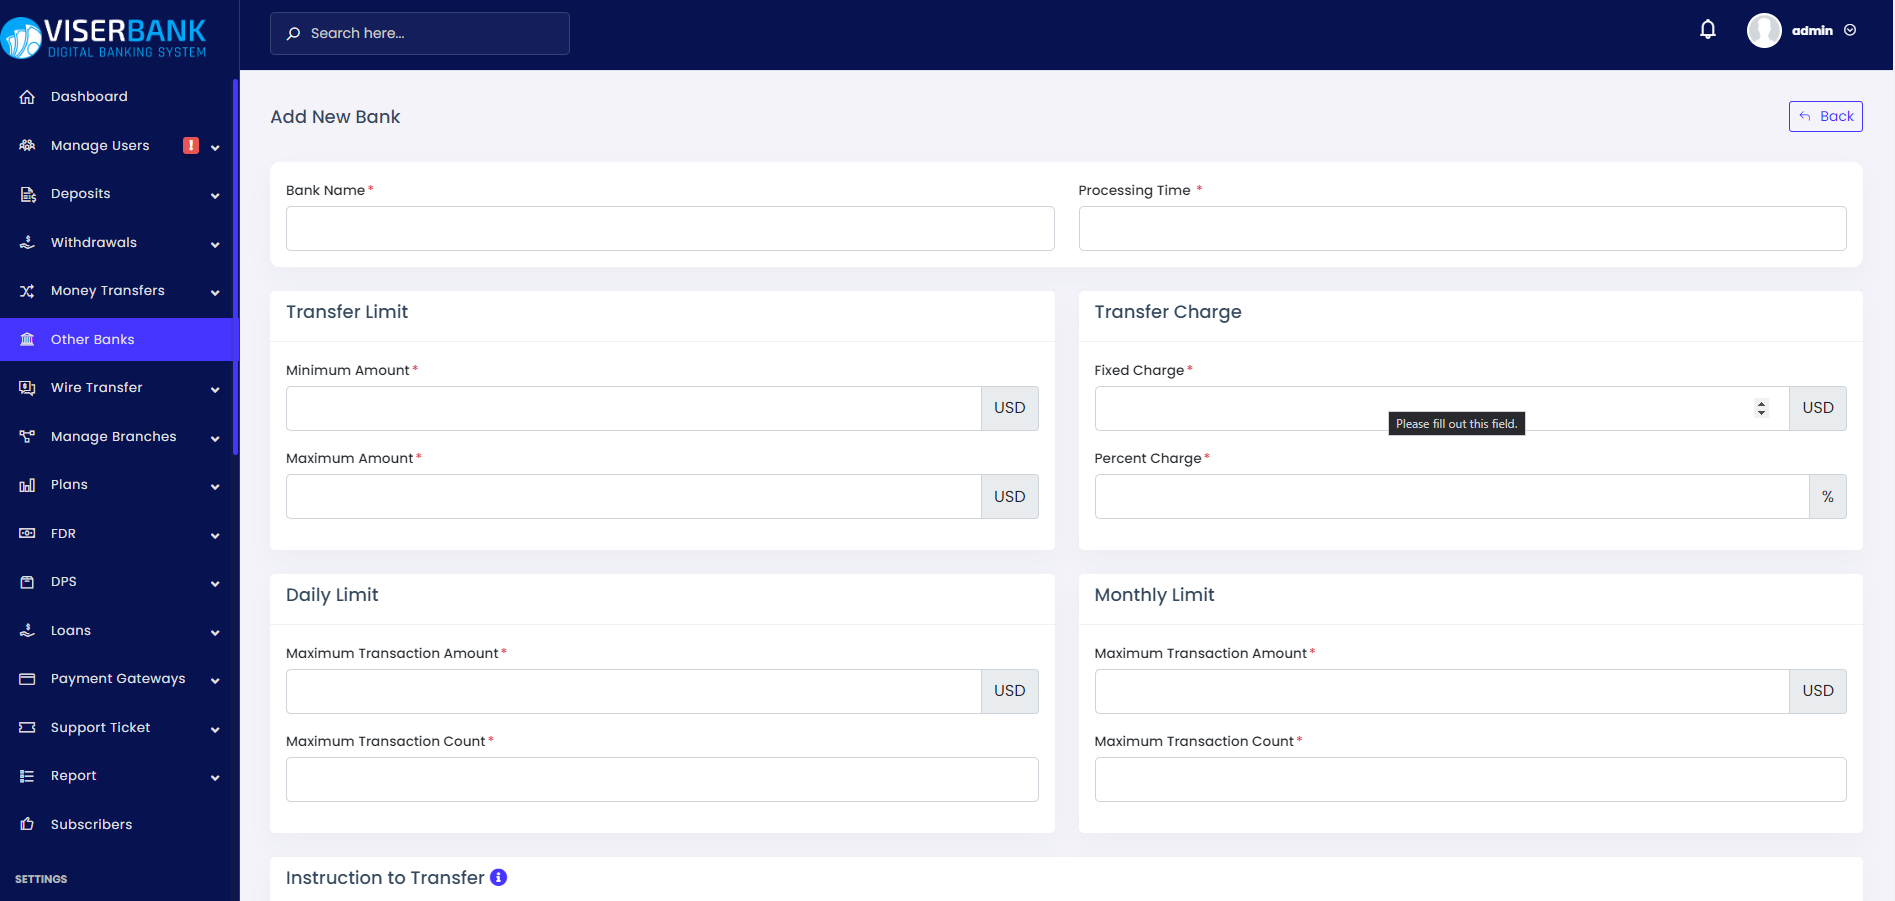
Admin can add new bank by clicking on the Add New button, and may update a bank details by clicking on the Edit button.
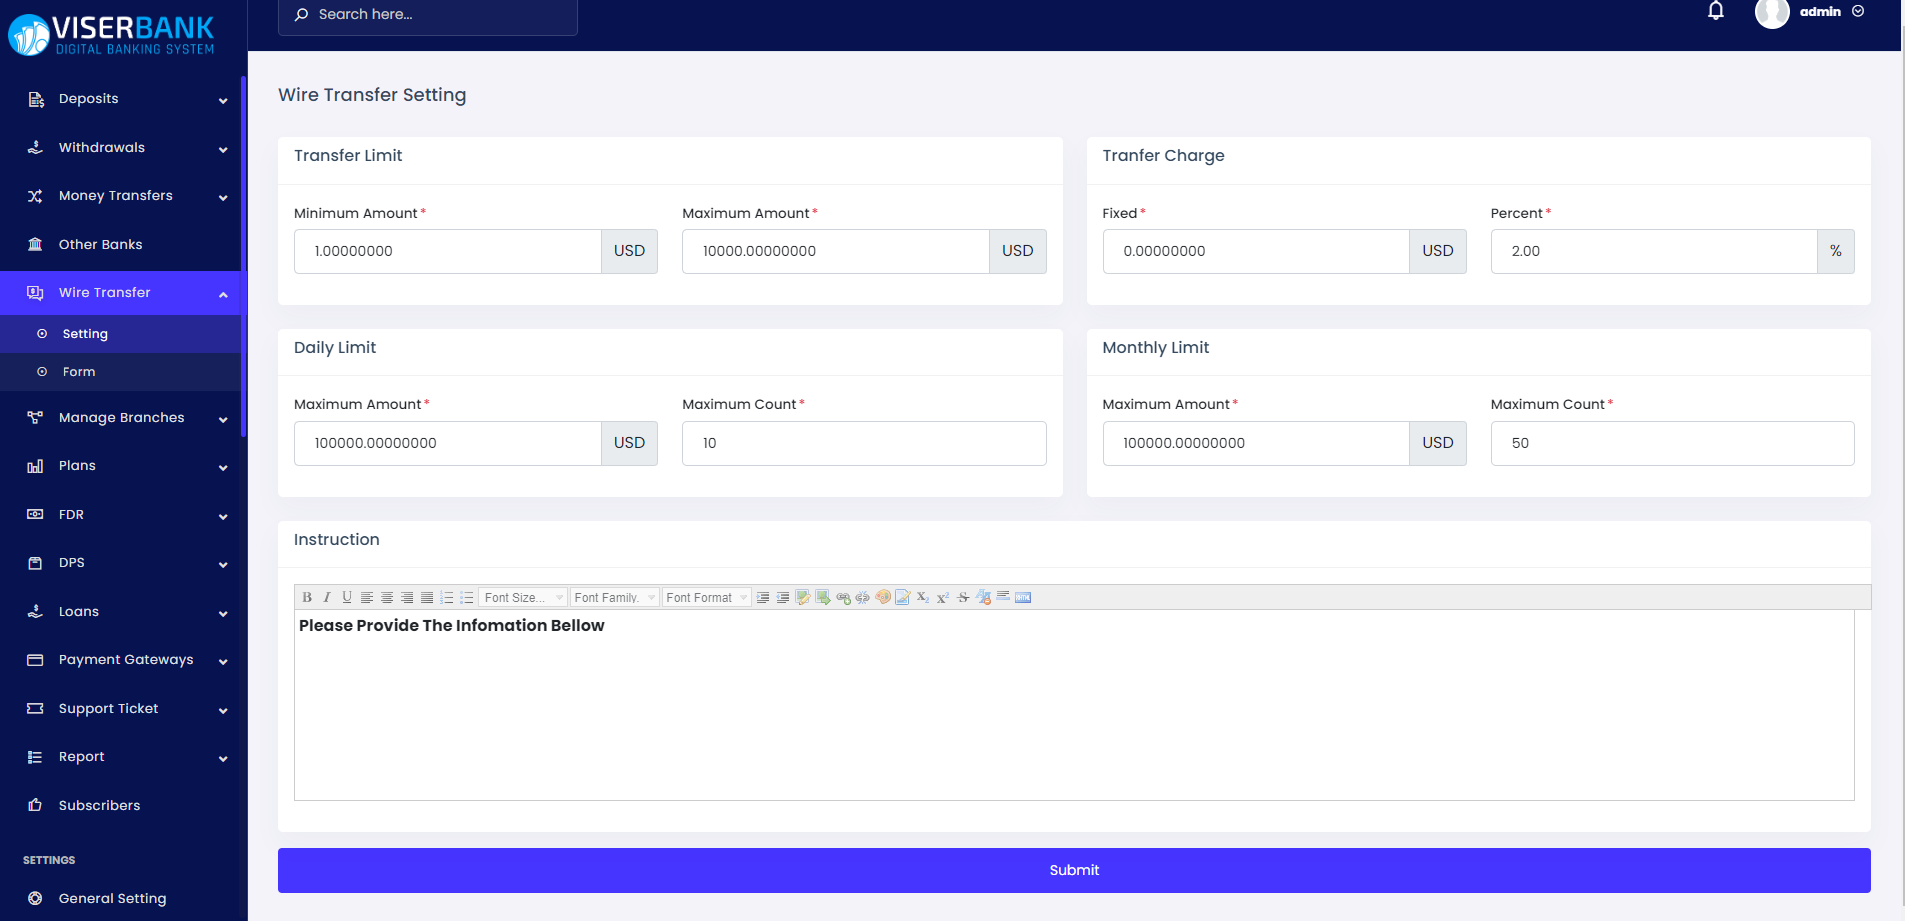
Admin can configure the wire transfer limit and charges here.
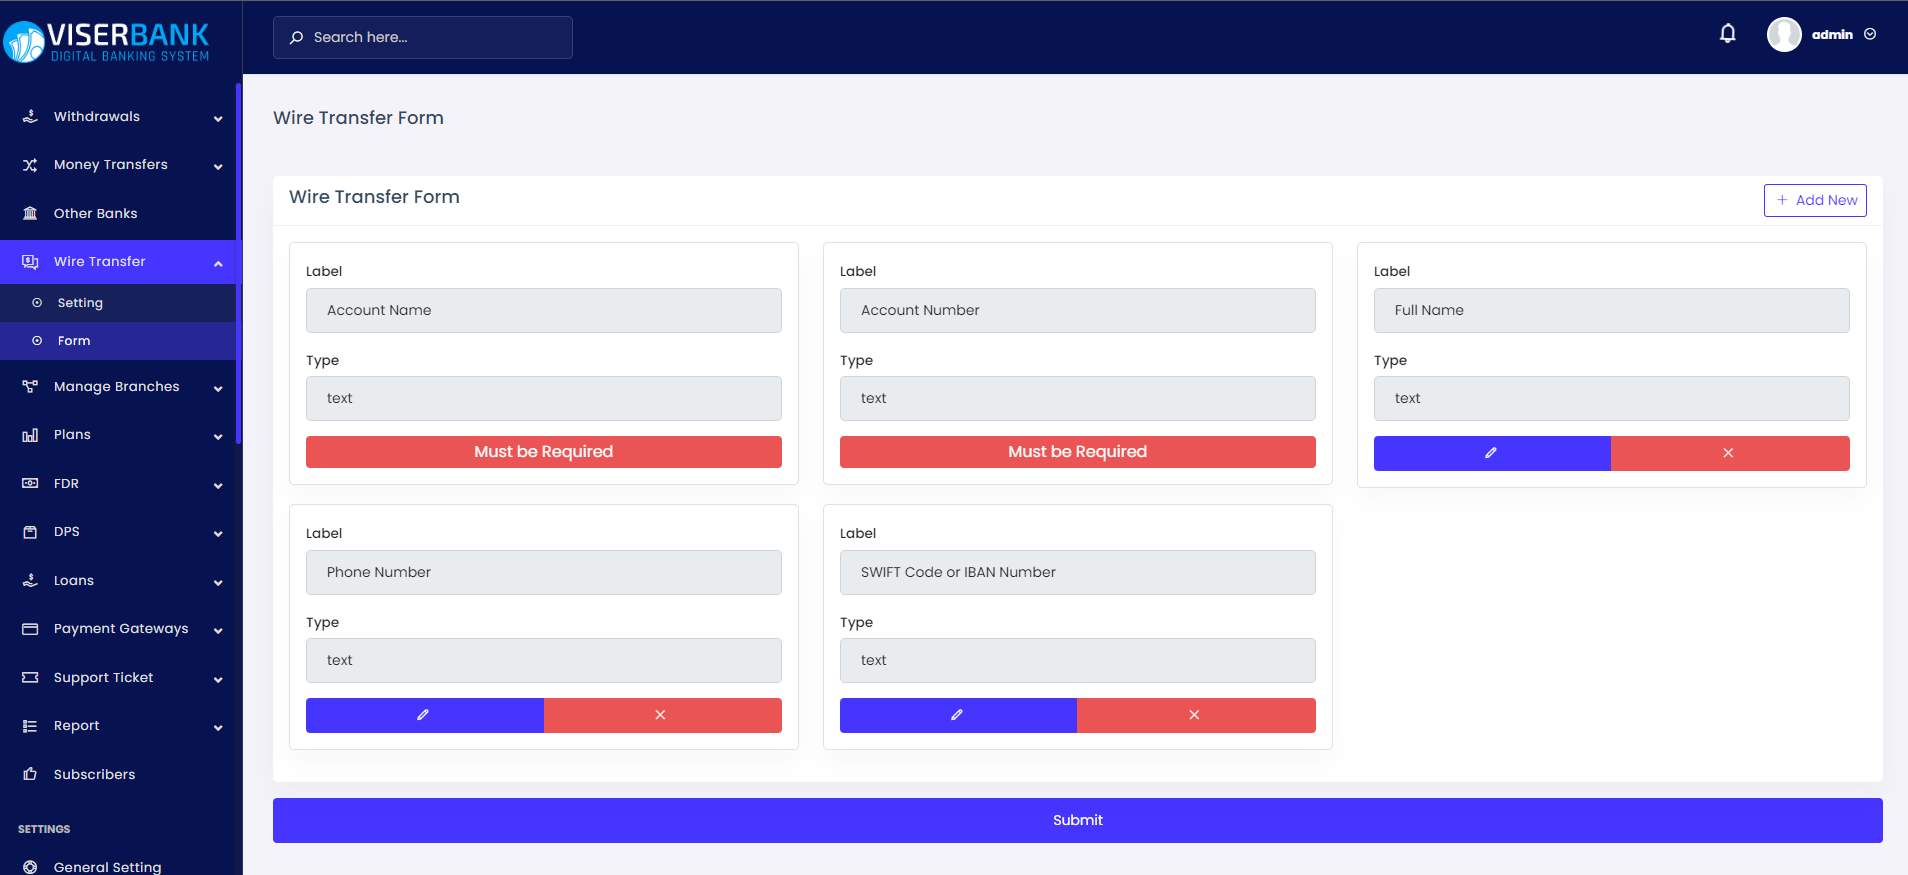
Admin can set up the Wire Transfer form for users from here. Users have to fill up the form for each transfer.
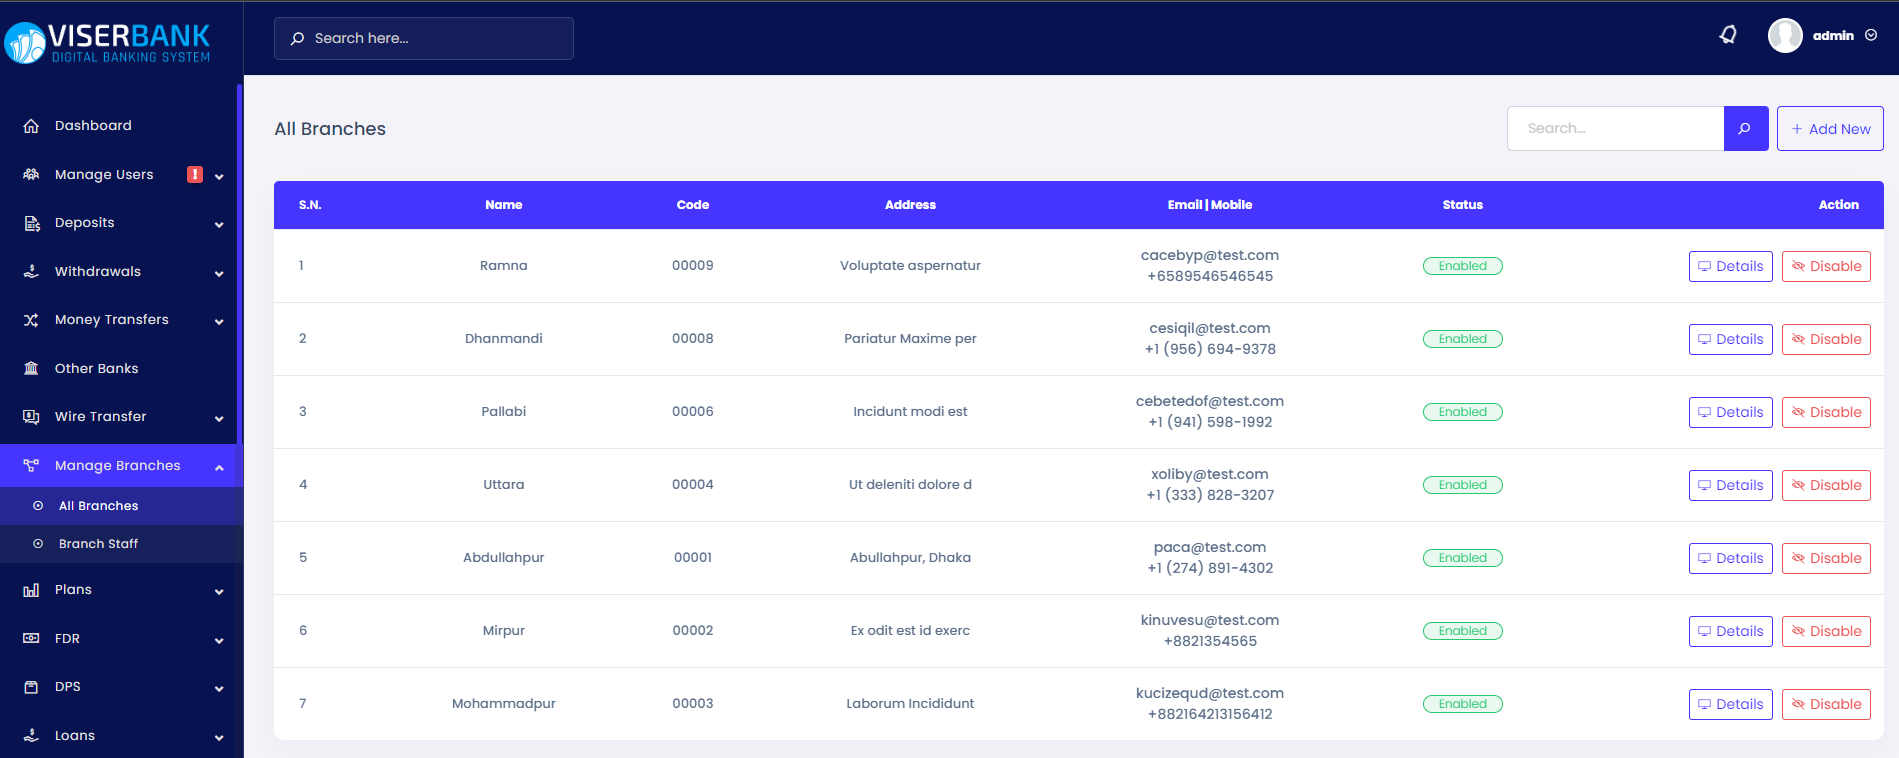
Admin can see the branch list from here. Branches also visible for anyone from the website/frontend footer menu.
To add a new branch admin needs to go the Add New Branch page by clicking on the Add New button at the top left corner. To update a branch info admin needs to go to the details page.
Admin can see the staff list and add staff for branches from here. Staff can login to the staff panel by their email and password. Password will be sent to their email after adding new staff. There are two types of staff for a branch:
To deposit/withdraw money the account officer needs to find the account by account number or user name from the home page.

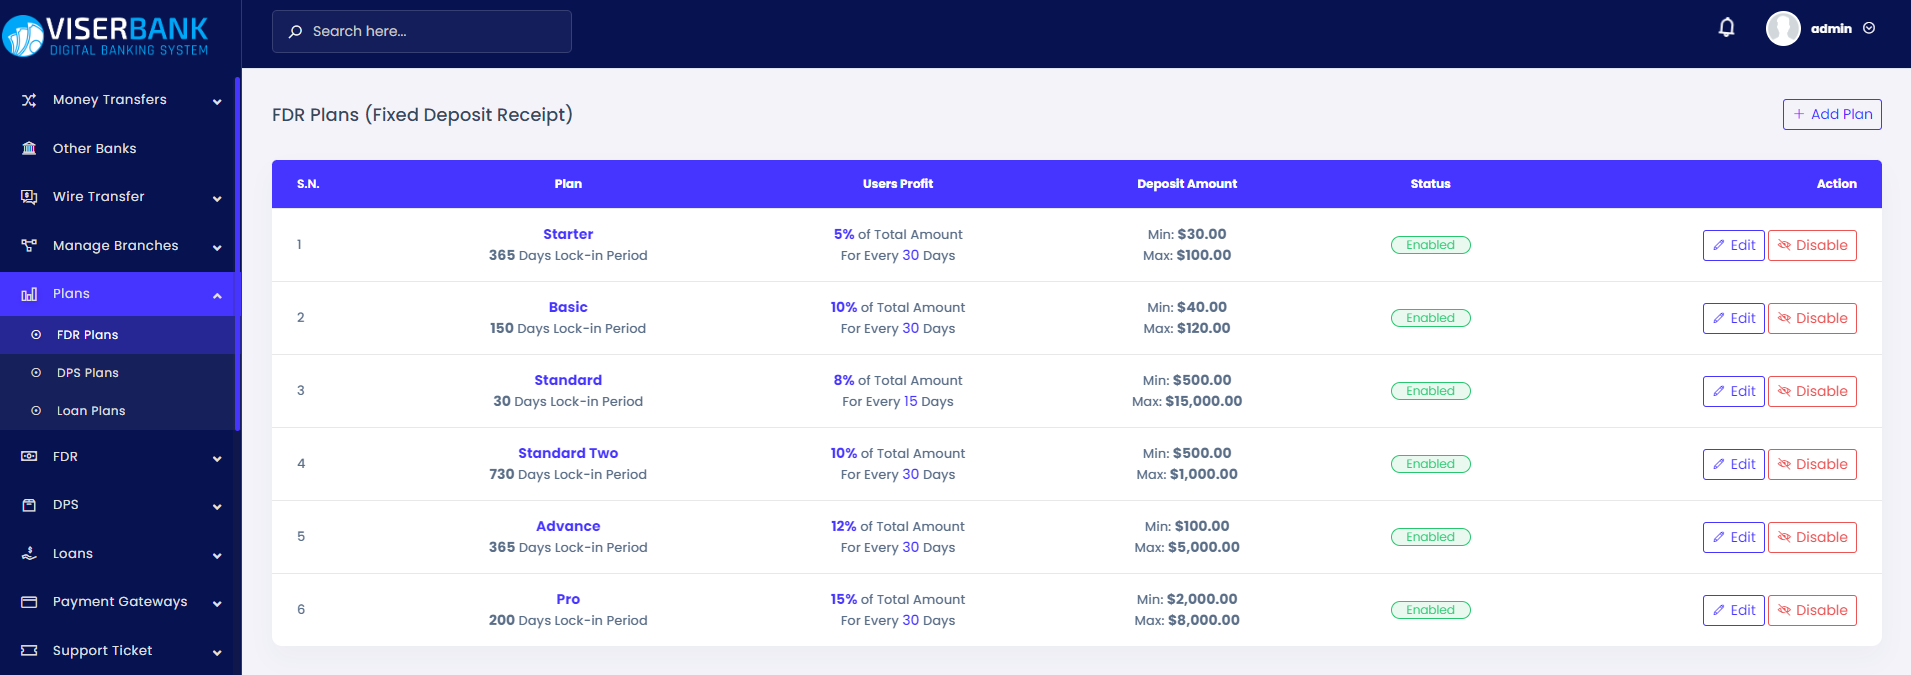
From the Plans menu, the admin can manage schemes for FDR, DPS, and loans. A single plan refers to a scheme.
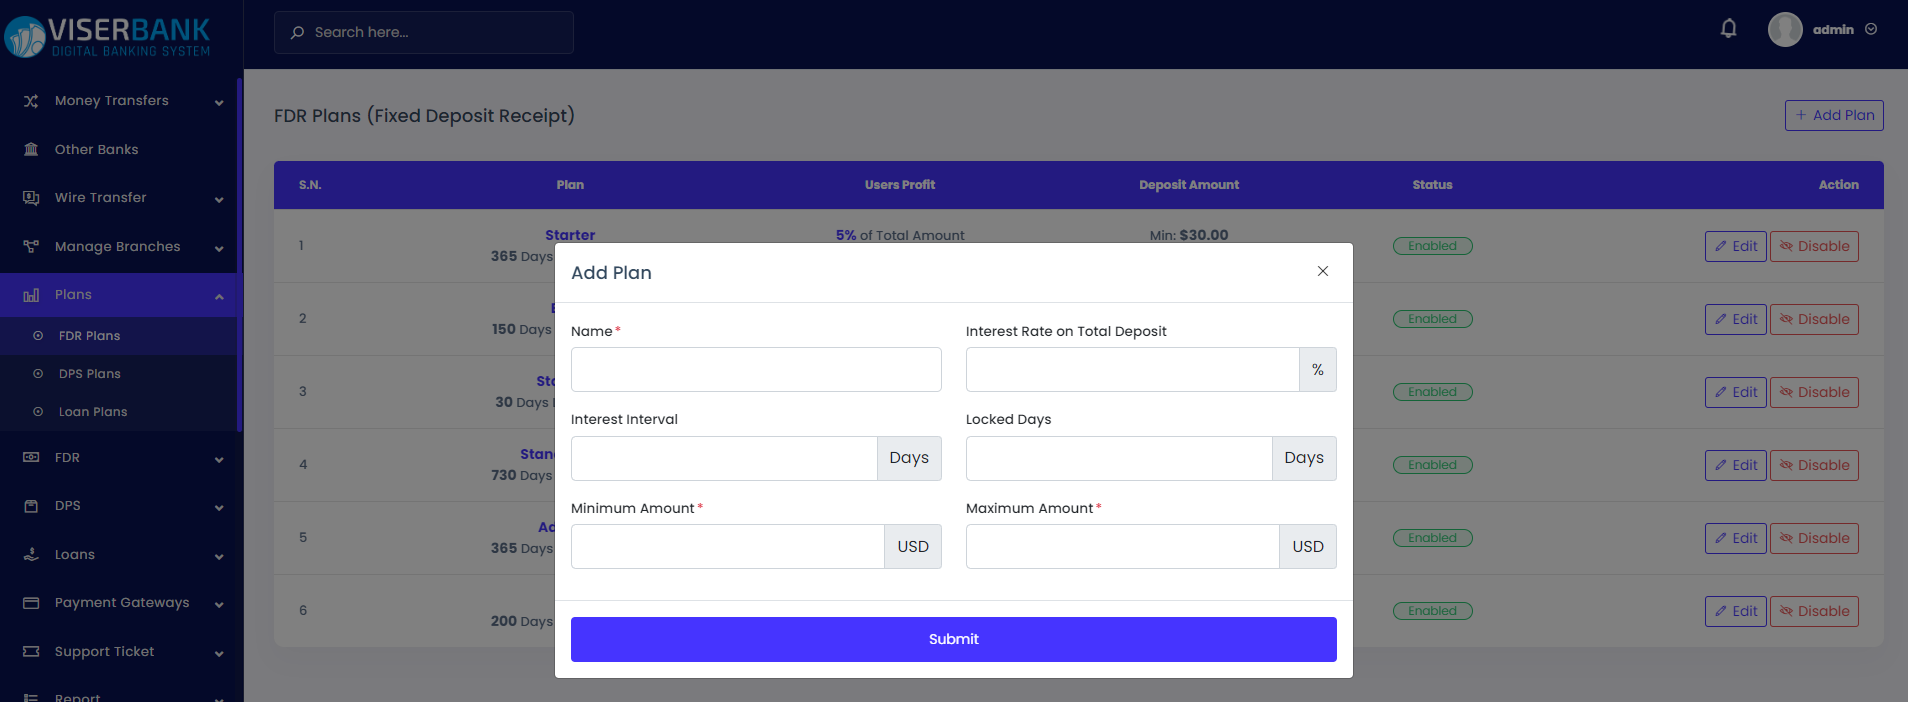
Fixed Deposit Schemes (FDR) plans can be managed from this menu. The admin can add/edit FDR plans from here. For an FDR plan, the admin needs to submit the following information below.
Max 40 characters ]
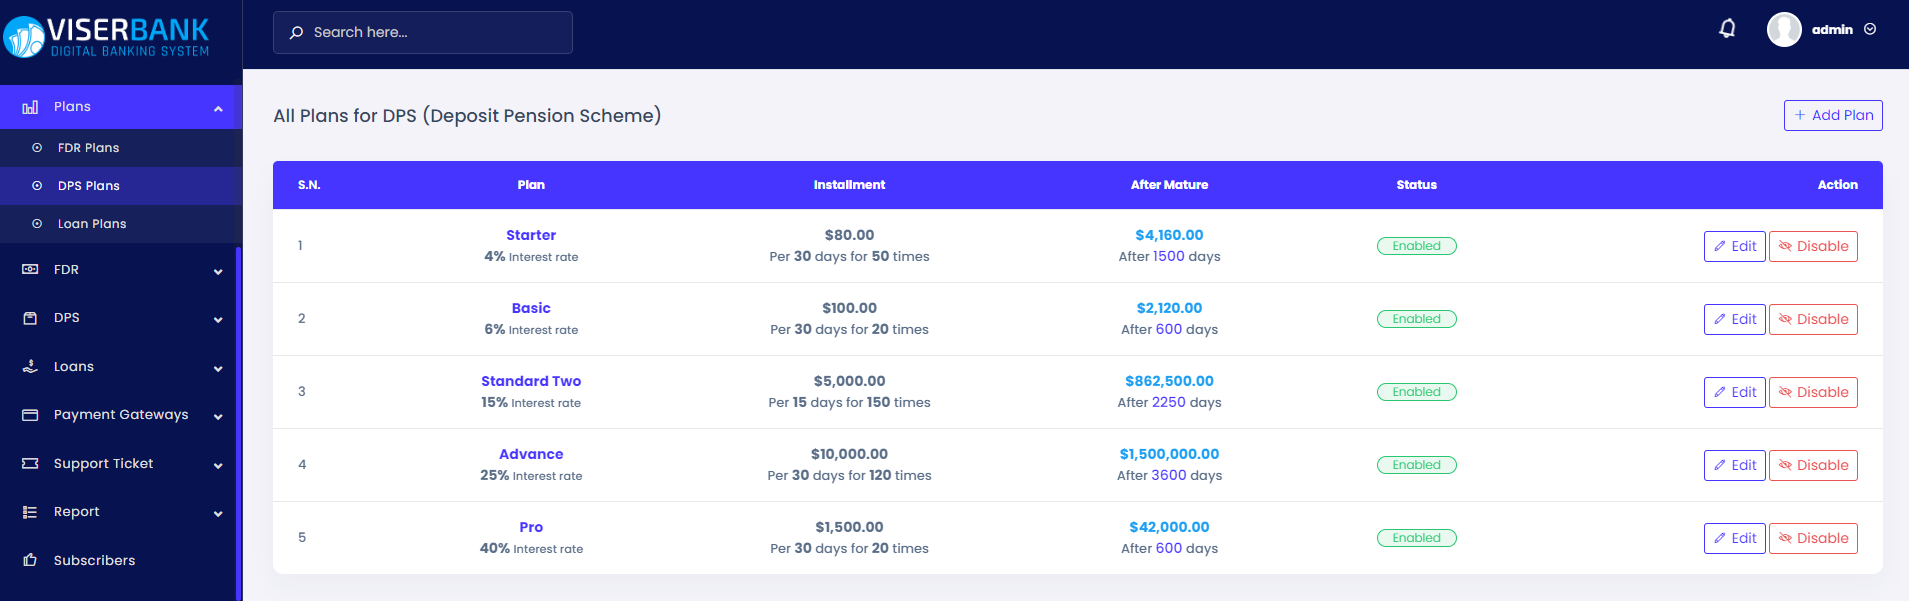
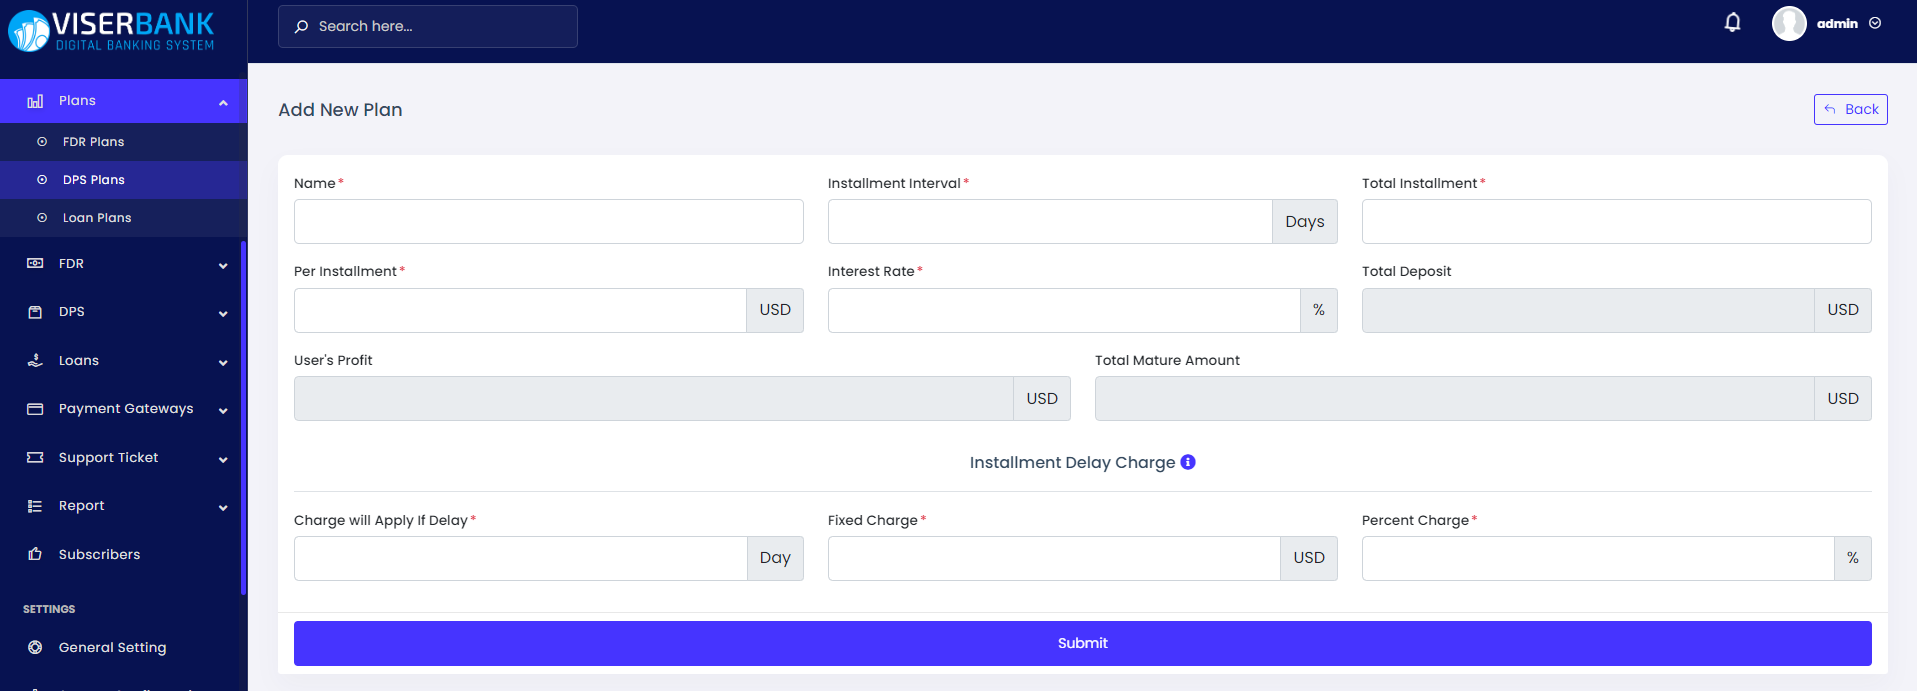
Deposit Pension Schemes (DPS) plans can be managed from this menu. The admin can add/edit DPS plans from here. For a DPS plan, the admin needs to submit the following information below.
Max 40 characters ]
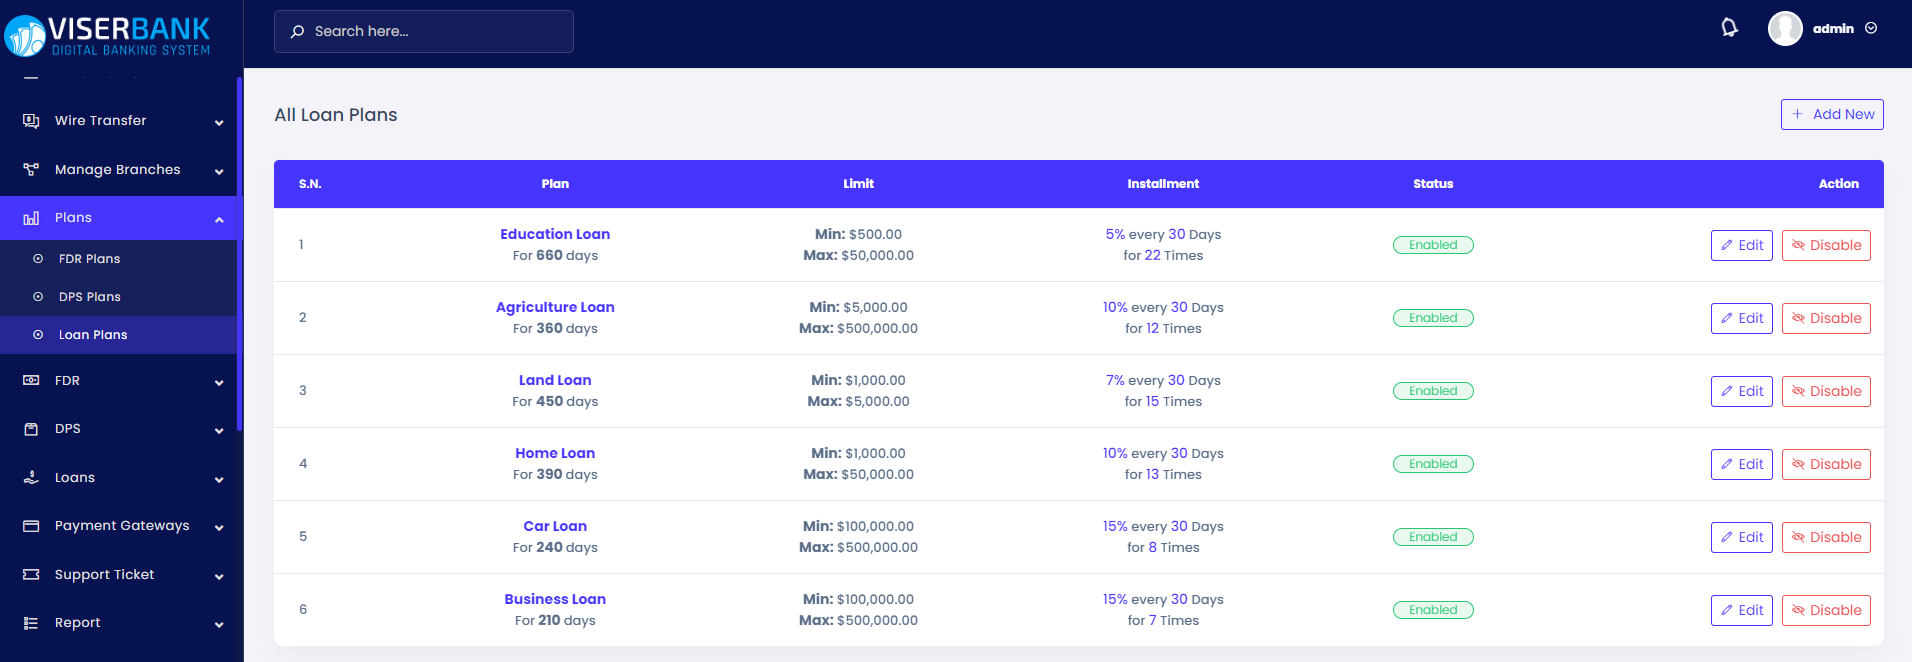
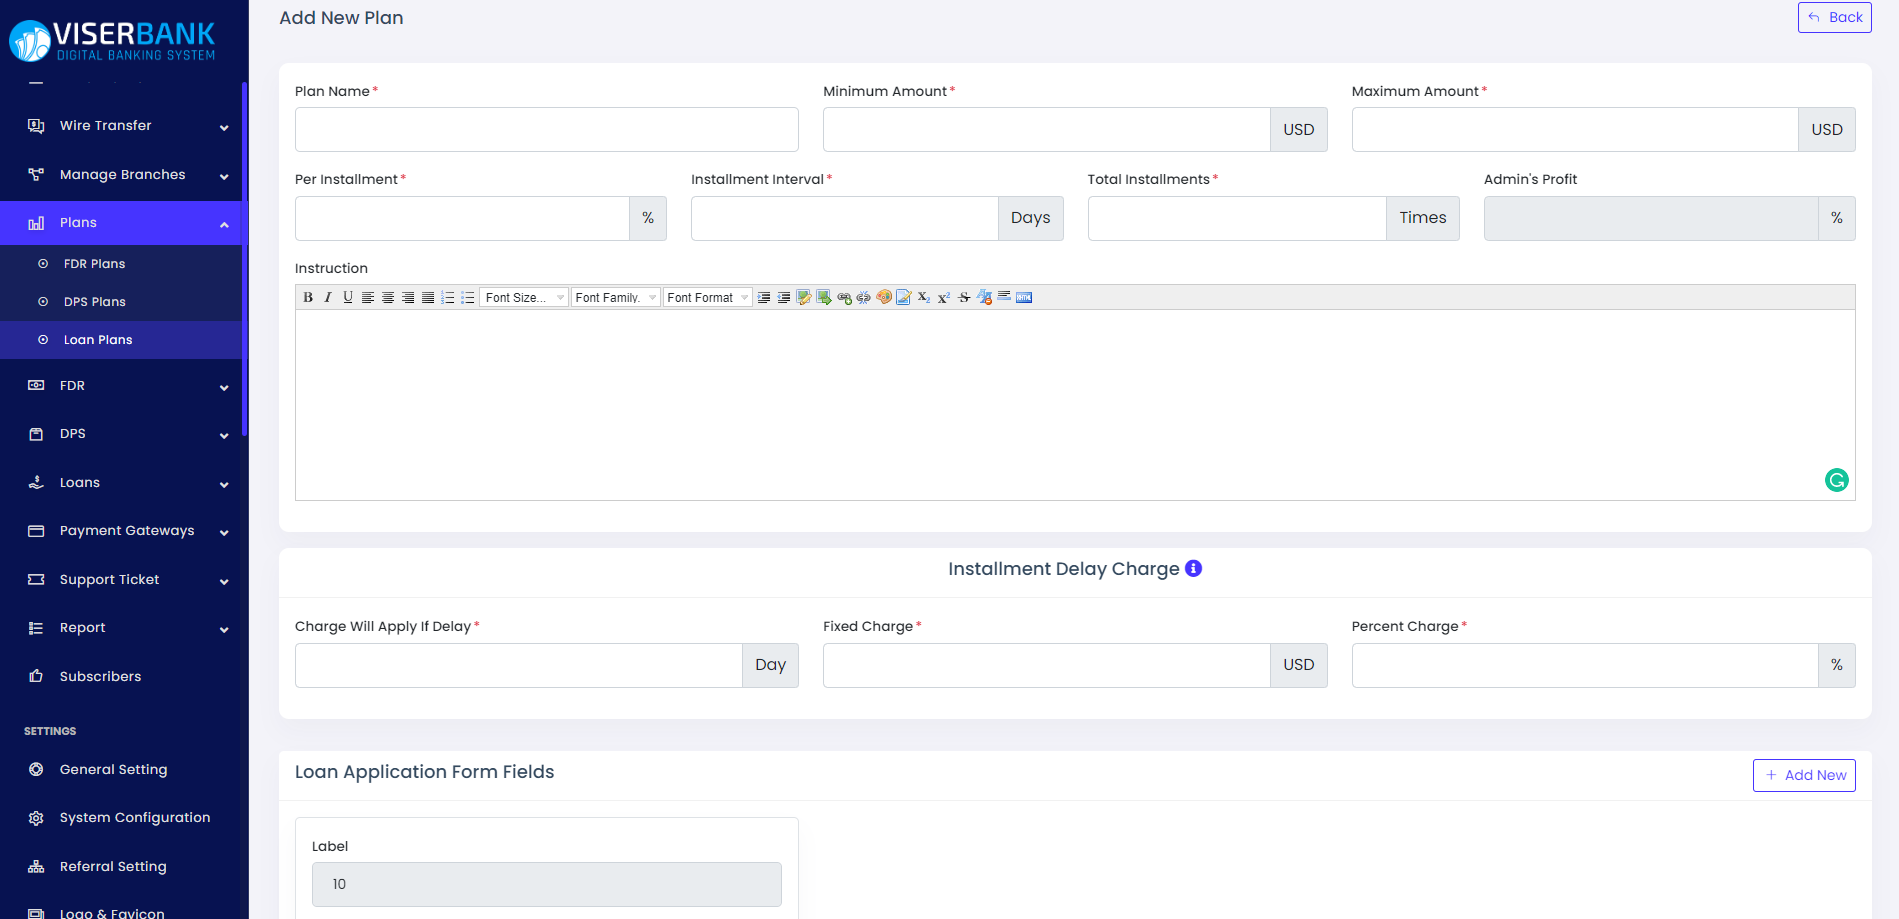
Loan plans can be managed from this menu. The admin can add/edit loan plans from here. For a loan plan, the admin needs to submit the following information below.
Max 40 characters ]
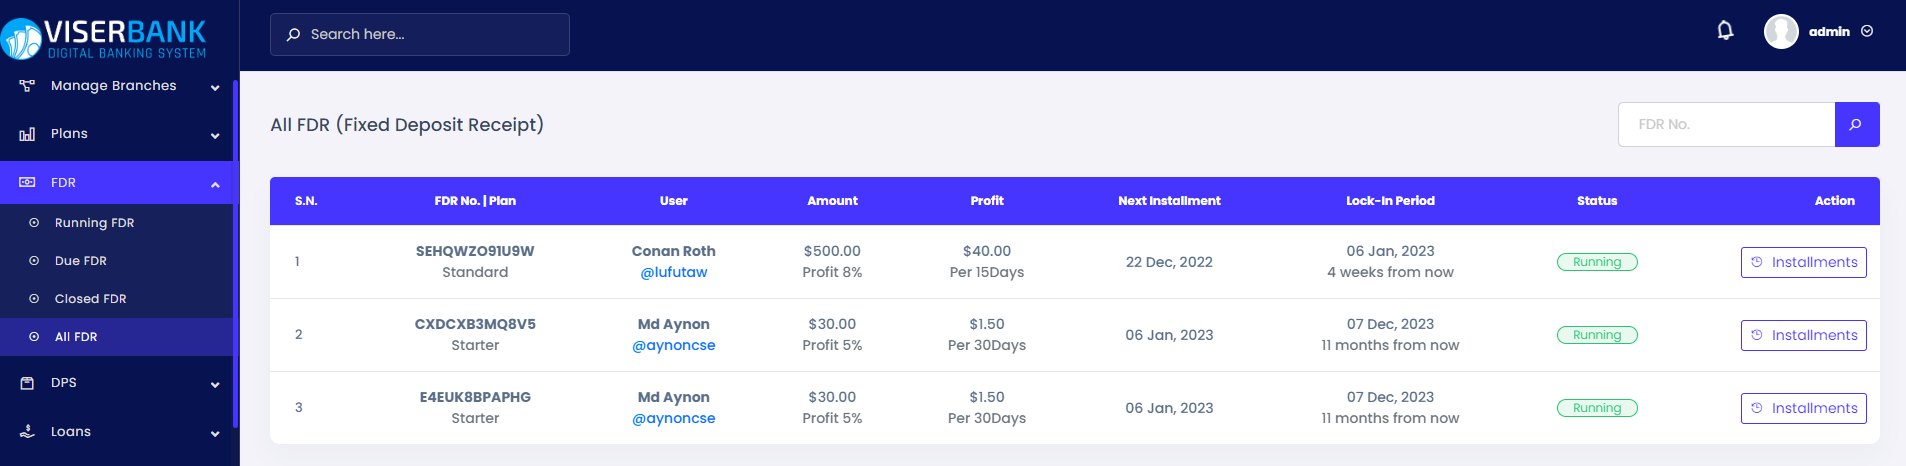
From the FDR menu, admin can see the list of fdr opened by the users.
Running FDR: The list of FDRs from which users are getting installments.
Due FDR: The list of FDRs from which users are not getting installments. This may happen
if the cron job commands are not executing properly on the server.
Closed FDR: This list of FDRs from which users have withdrawn the deposited amount.
Admin can see the installment history from the Installments button of each fdr.
N.B. The installment amount will be added to the user's account automatically by executing
a cron-job command on the server. You just need to configure the cron job command on the server.
From the DPS menu, admin can see the list of DPS opened by the users.
Running DPS: The list of DPSs from which users are paying installments.
Due DPS: The list of DPSs from which users are not paying installments. This may happen
if the cron job commands are not executing properly on the server or the user doesn't have
sufficient balance.
Matured DPS: The list of DPSs of which all installments have been paid.
Admin can see the installment history from the Installments button of each DPS.
N.B. The installment amount will be deducted from the user's account automatically by
executing a cron-job command on the server. You just need to configure the cron job command on the
server.
From the Loan menu, admin can see the list of loan applied by the users.
Pending Loans: The list of Loans awaiting approval. If a user applies for a loan this
will
be considered a pending loan at first admin may approve or reject this application.
Running Loans: The list of loans that admin approved and users are paying installments.
Due Loans: The list of Loans from which users are not paying installments. This may
happen
if the cron job commands are not executing properly on the server or the user doesn't have
sufficient balance.
Paid Loans: The list of Loans of which all installments have been paid.
Rejected Loans: The list of loans that rejected by the admin.
Admin can see the installment history from the Installments button of each Loan.
N.B. The installment amount will be deducted from the user's account automatically by
executing a cron-job command on the server. You just need to configure the cron job command on the
server.
We have two types of payment gateways like Automatic Gateways and Manual Gateways .
Automatic Gateways: We have added 25+ automatic gateways in this system. Admin just need to configure with valid credentials. If the users deposit money by automatic gateway, admin doesn't need to approve.
Manual Gateways: Admin can add manual gateways as he/she want. If the users deposit money by automatic gateway, admin need to approve.
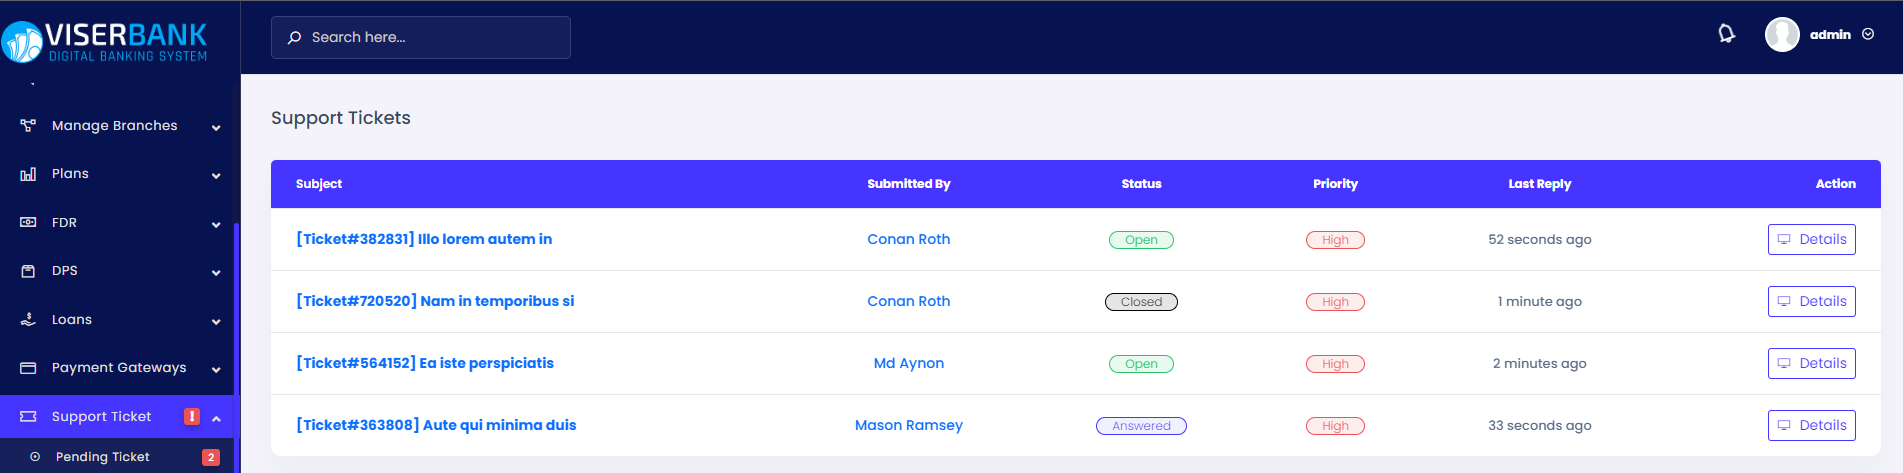
From the Support Ticket menu, admin can manage all support tickets opened by the users. Admin is able to reply or close a ticket from its details page.
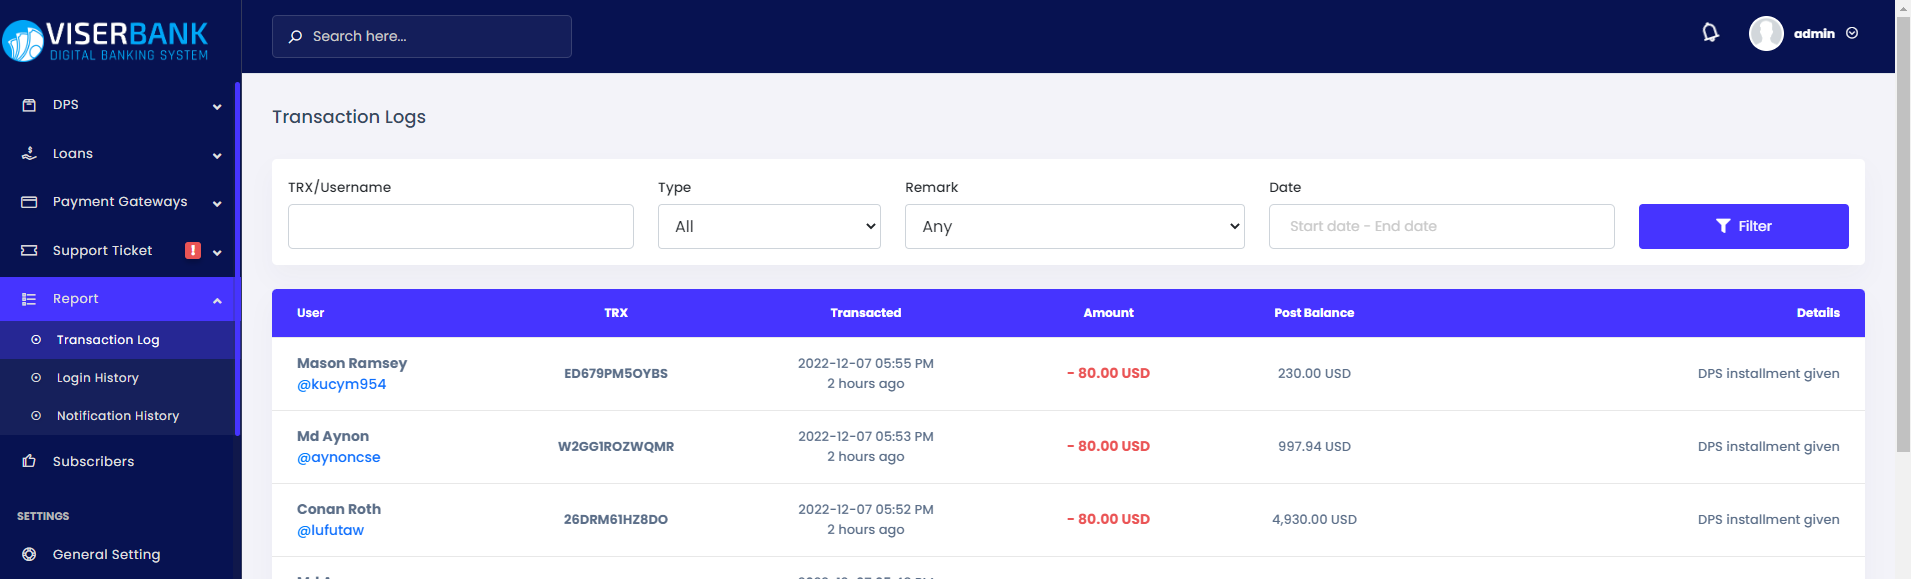
From the Report menu, admin can see the Transaction Log, Login History and the Notification History.
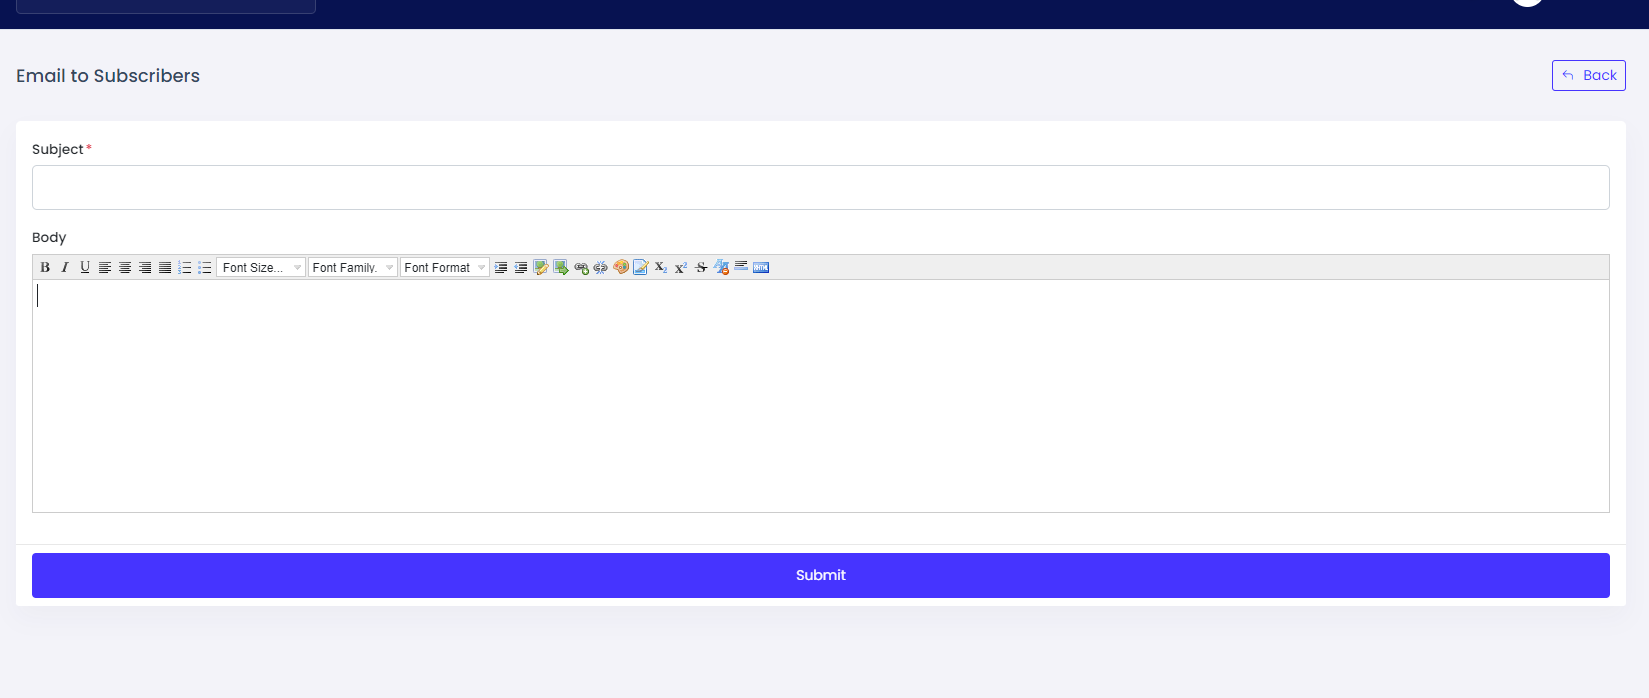
Anyone can subscribe from the footer section of the website of this system. Admin can send emails to subscribers for promotional purposes or any other notices.
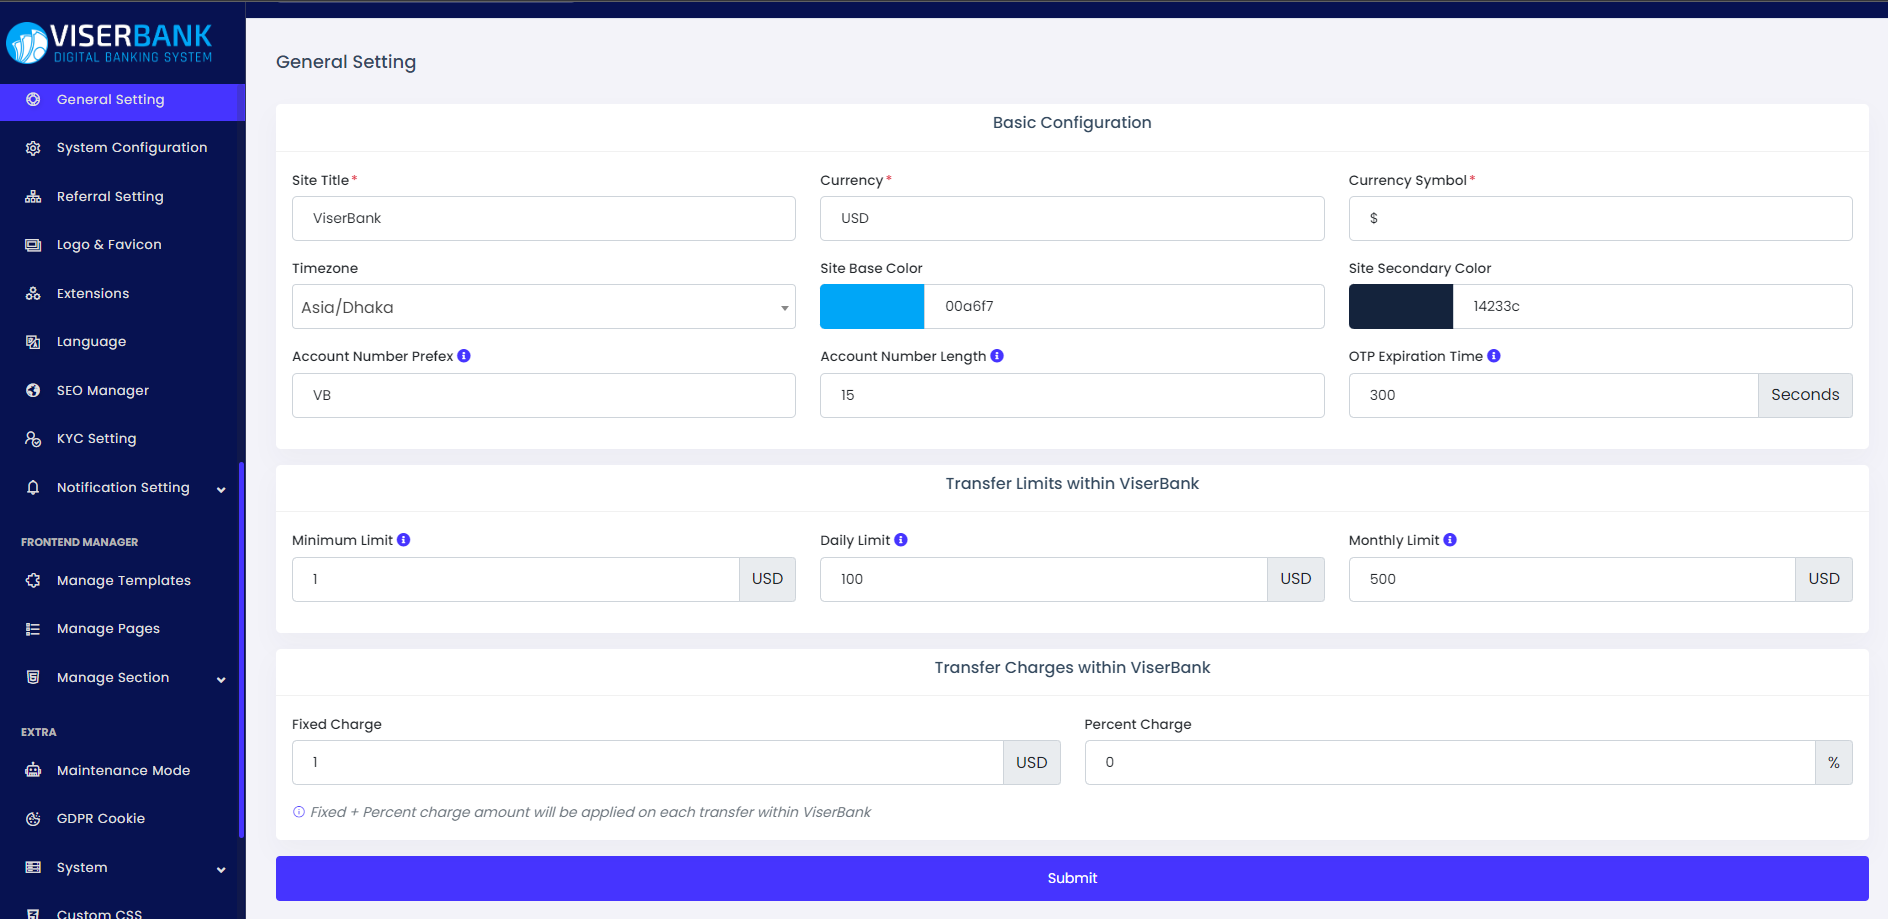
You can set the basic information from the general setting.
Site Title: The name of your website.
Currency: The base currency of your system.
Currency Symbol: The symbol of the base currency.
Time Zone: Timezone of your application.
Base Color: The base color of your website/frontend.
Secondary Color: The secondary color of your website/frontend. We prefer to pick a dark color for this.
Account Number Prefix: This text will be added at the beginning of account number.
Account Number Length: Length of the account number without the prefix.
OTP Expiration Time: Enter the value in seconds. An OTP code will be expired after that seconds.
Minimum Limit: Users can't transfer more than the minimum amount within your bank in a single transaction.
Daily Limit: The amount users can transfer within your bank on a date.
Monthly Limit: The amount users can transfer within your bank in a calendar month.
Fixed Charge: The fixed amount as a charge on your own bank transfer.
Percent Charge: The percentage of the transfer amount as a charge on your own bank transfer.
Admin can change the logo and favicon from here.
If the logo and favicon are not changed after you update from this page, please clear the cache from your browser. As we keep the filename the same after the update, it may show the old image for the cache. usually, it works after clear the cache but if you still see the old logo or favicon, it may be caused by server level or network level caching. Please clear them too.
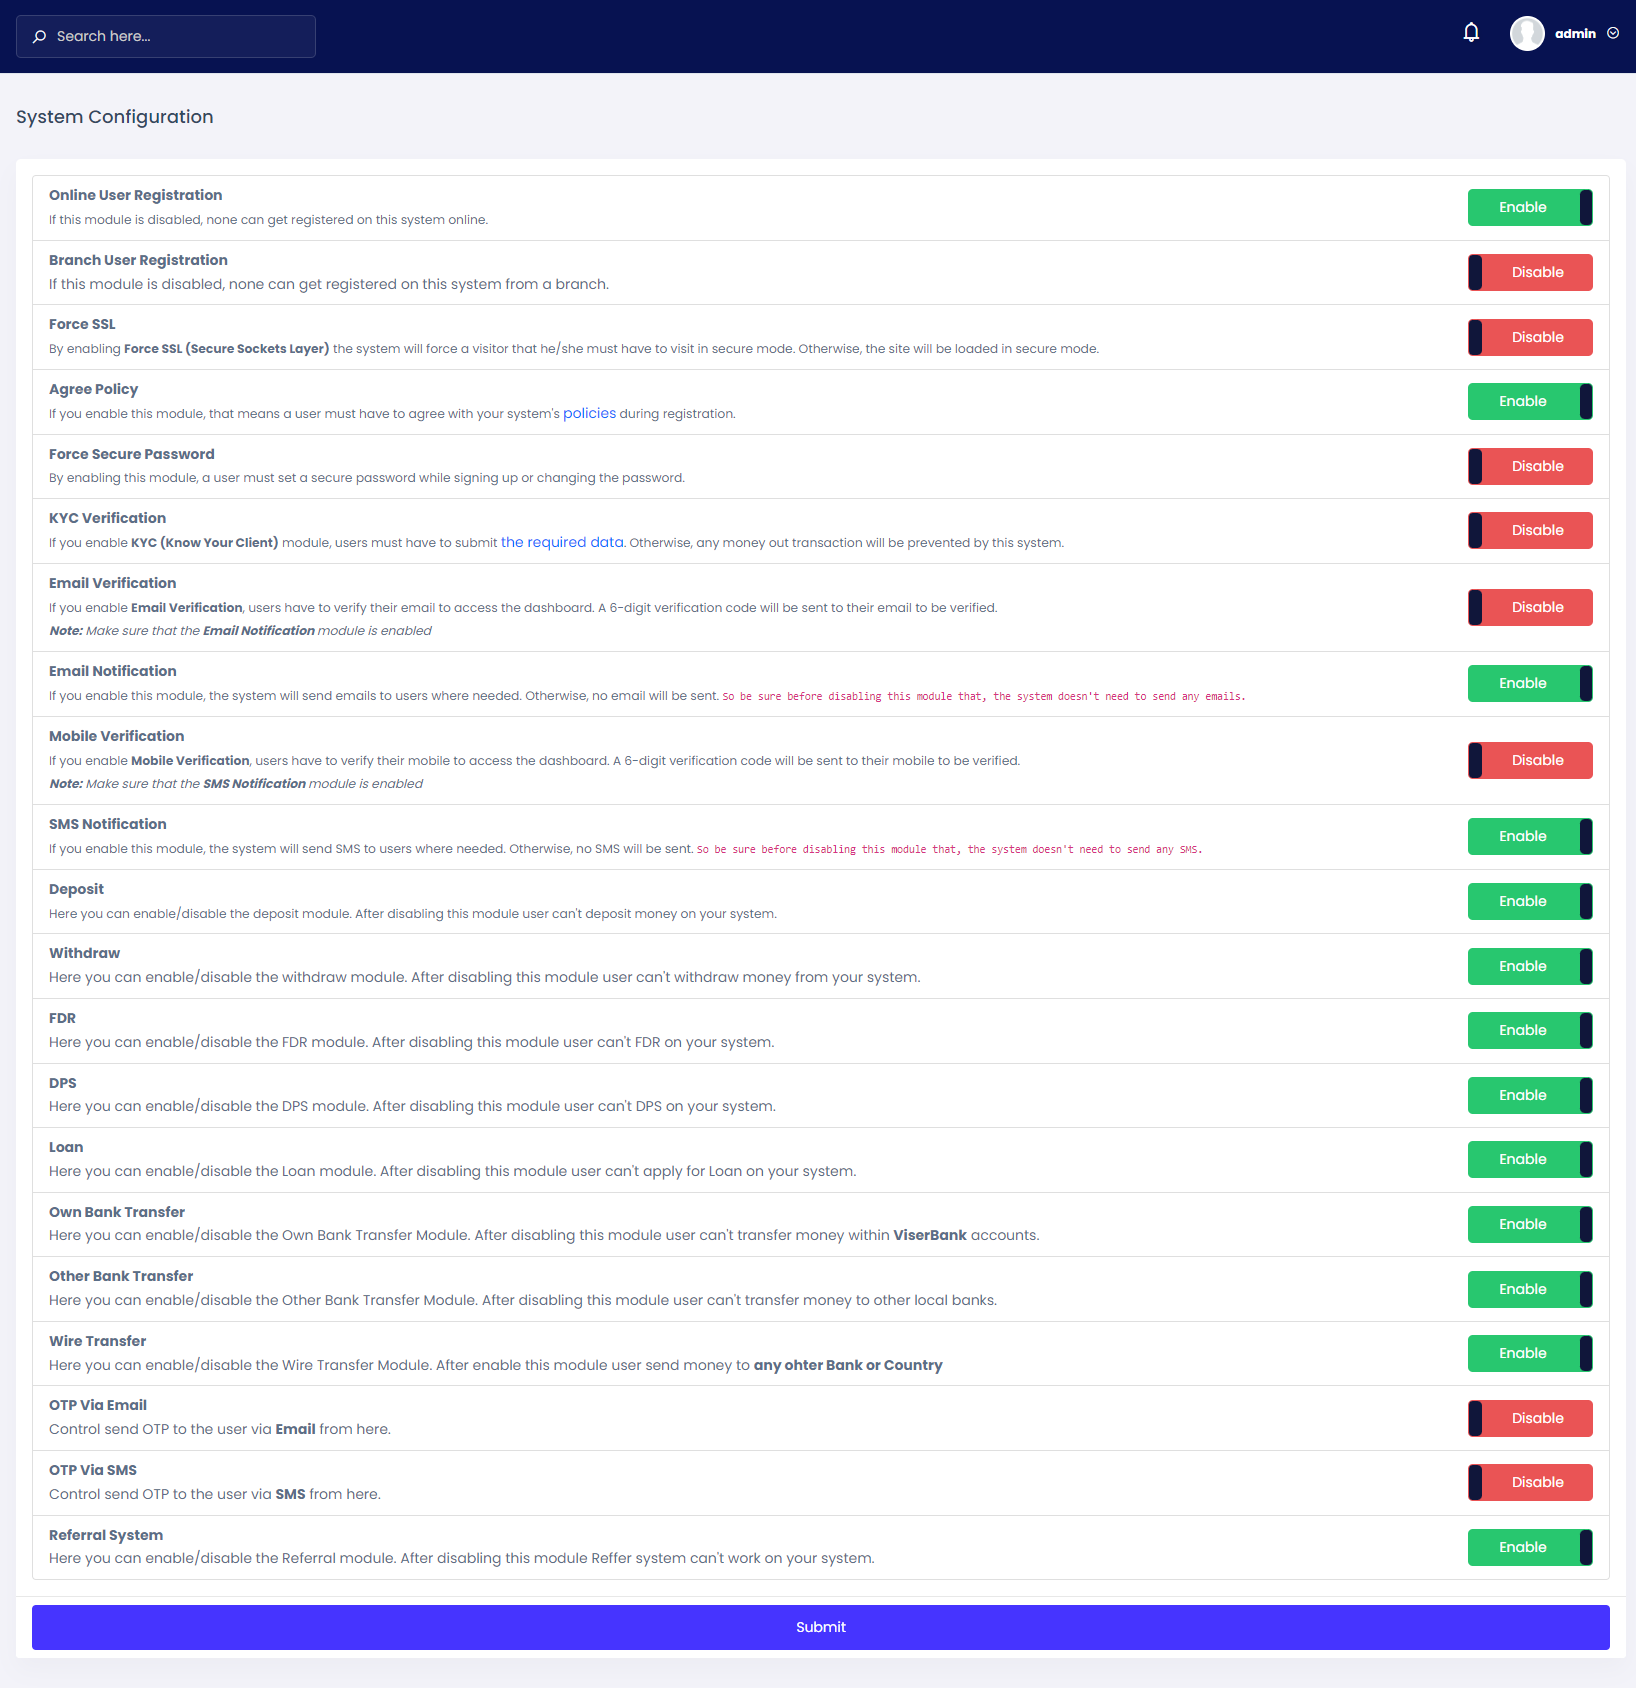
From the System configuration menu admin can control the settings and modules of the system like User/Account registration, Forcing users to set secure password, KYC Verification, Email Verification, Mobile Verification, SMS Notification, Email Notification, Deposit, Withdraw, FDR, DPS, Loan, Own Bank Transfer, Other Bank Transfer, OTP Via Email, Otp Via SMS, Referral System and more.
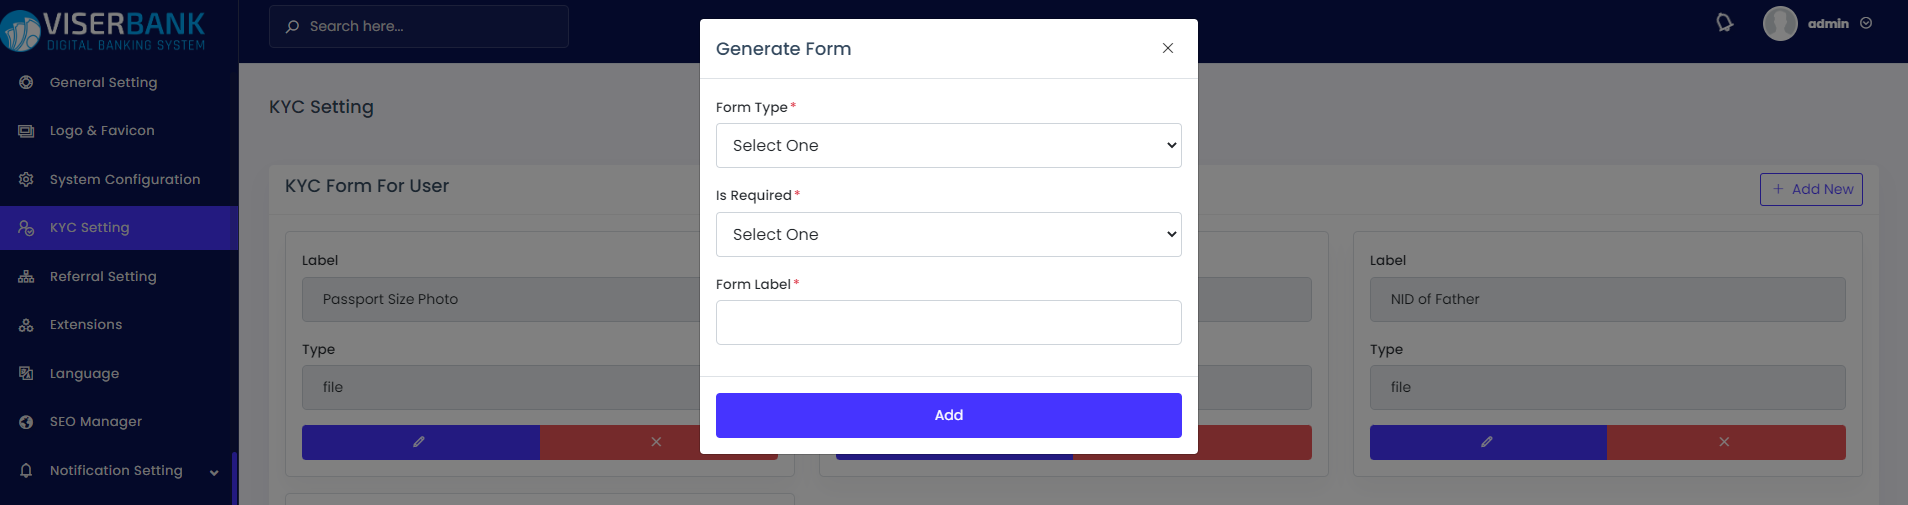
From the KYC Setting Menu admin can make the KYC form for user as he want.
KYC (Know Your Client) is an important features in this system. Admin may need to verify the
User/Account holder by several documents like Passport, Driving License, National Identity Card,
etc.
Admin can add fields by clicking on the Add New button.
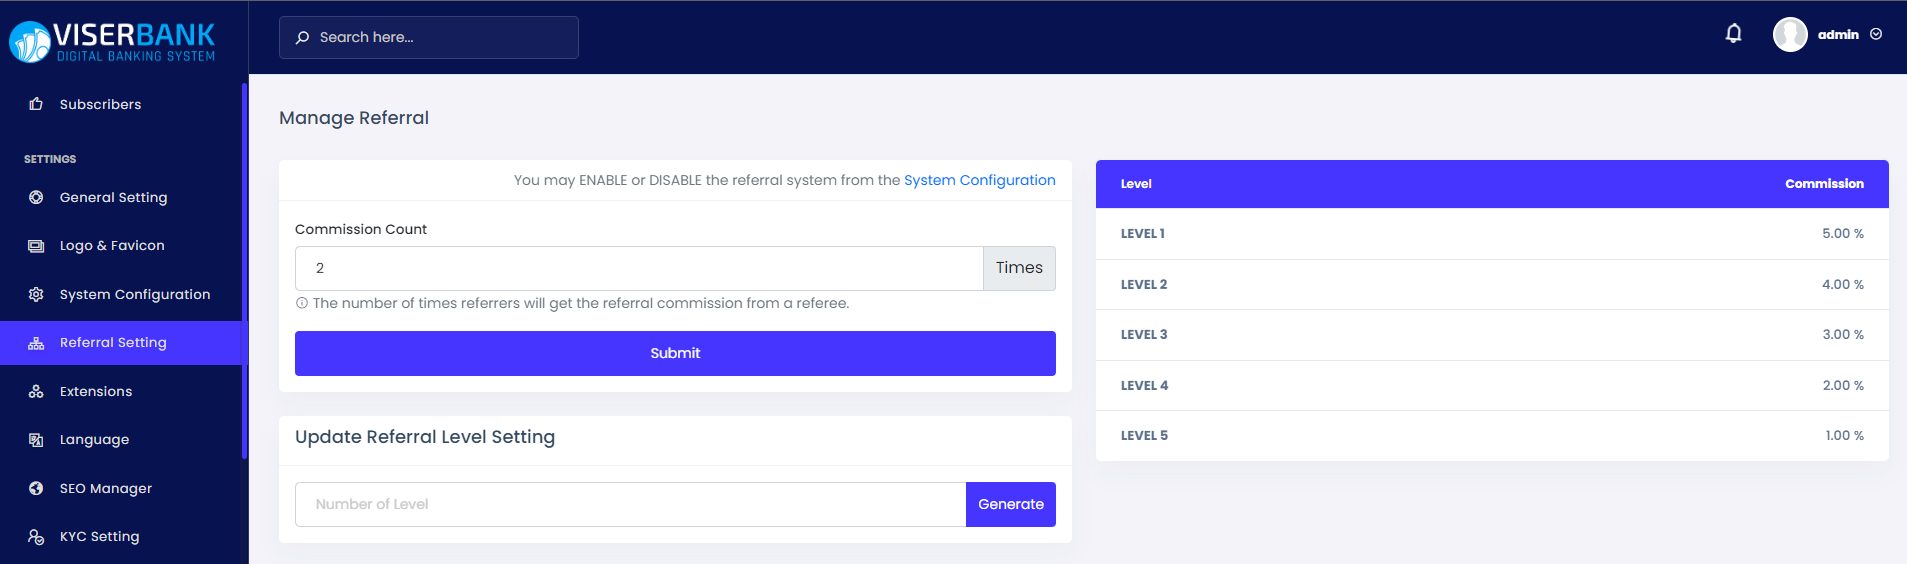
If you enable the referral system user may refer their friends or family to open an account in your bank. As the referral system is multilevel the referrers will get a referral commission when the referee account deposit money. And you can control the referral setting from here.
Commission Count: The times the referrers will get the referral commission.
Level Setting: Admin can set the levels as many as he wants and set up on which level how much commission wants to give to referrers. And admin is able to update the system any time.
Admin can see the commission log from Report > Transaction Log menu by filtering the data by selecting Remark and selecting Referral commission
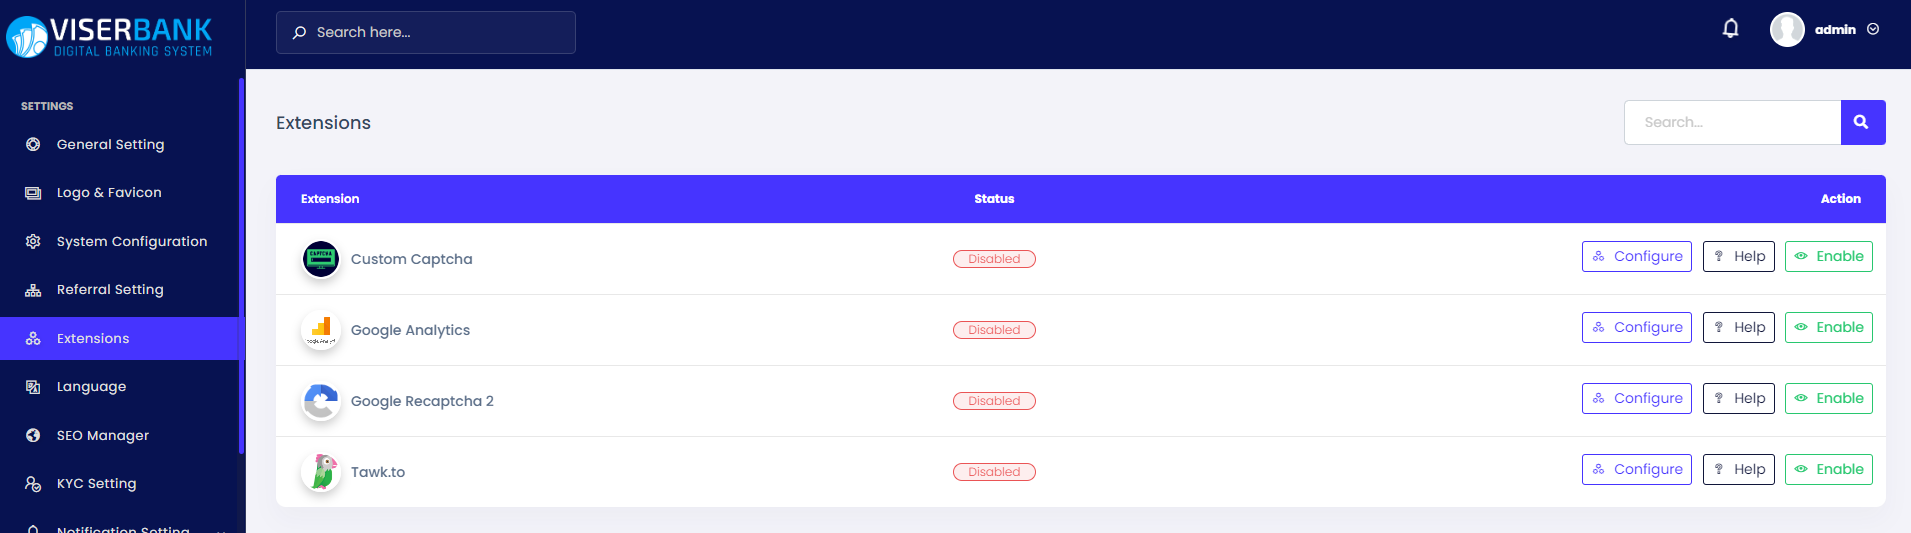
Extensions are some third-party plugins we have used you can configure them from here.
Custom Captcha: To test the human identity of the visitors a randomly generated sequence of letters and/or numbers appears as an image. This custom captcha is enabled, the captcha will appear in every form on the website and visitors need to prove their human identity by submitting the exact text in the captcha image.
Google Recaptcha 2:reCAPTCHA is a free service from Google that helps protect
websites from spam and abuse. A “CAPTCHA” is a turing test to tell human and bots apart.
We prefer to use Google Captcha over Custom Captcha.
Get the Site Key and Secret Key from here
Google Analytics: Google Analytics is a web analytics service that provides statistics and basic analytical tools for search engine optimization (SEO) and marketing purposes. The service is part of the Google Marketing Platform and is available for free to anyone with a Google account.
Tawk.to: Twak To is a chat tool It's a powerful free web chat tool that makes it easy for customers to message you through your website.
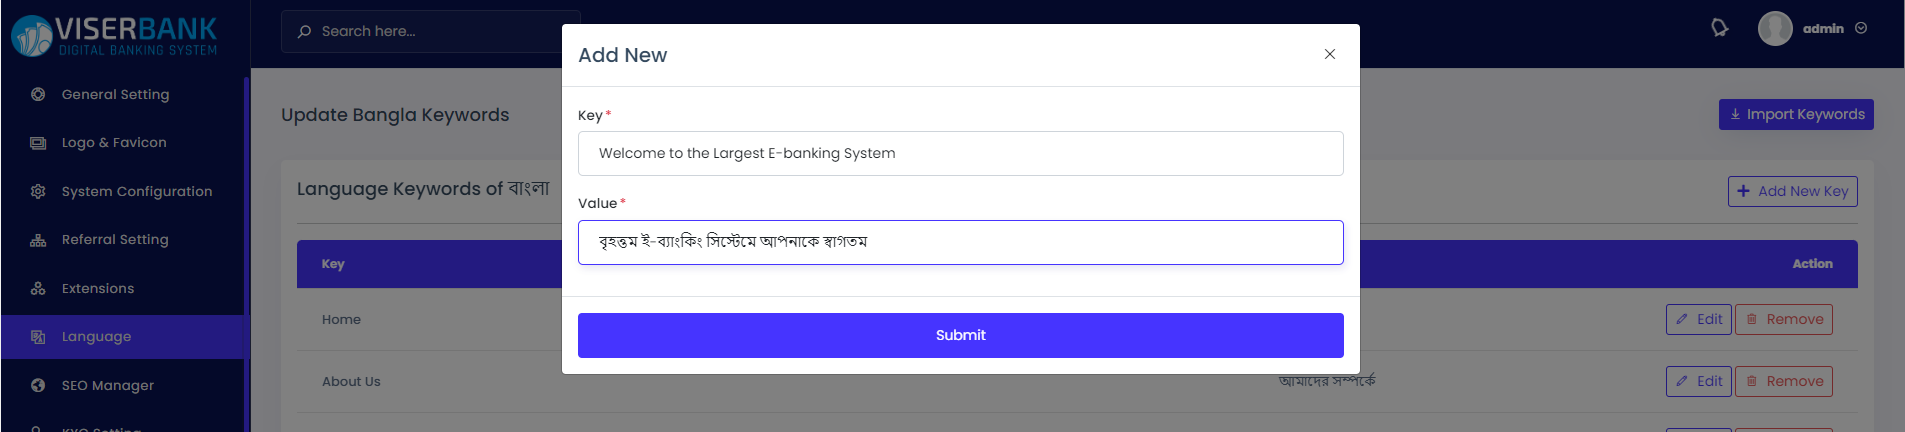
As our system is multilingual, the admin can add multiple languages from here. Admin needs to add keywords in English as the system has, and needs to translate them into the language he/she wants to translate. As our system is multilingual, the admin can add multiple languages from here. Admin needs to add keywords in English as the system has, and needs to translate them into the language he/she wants to translate.
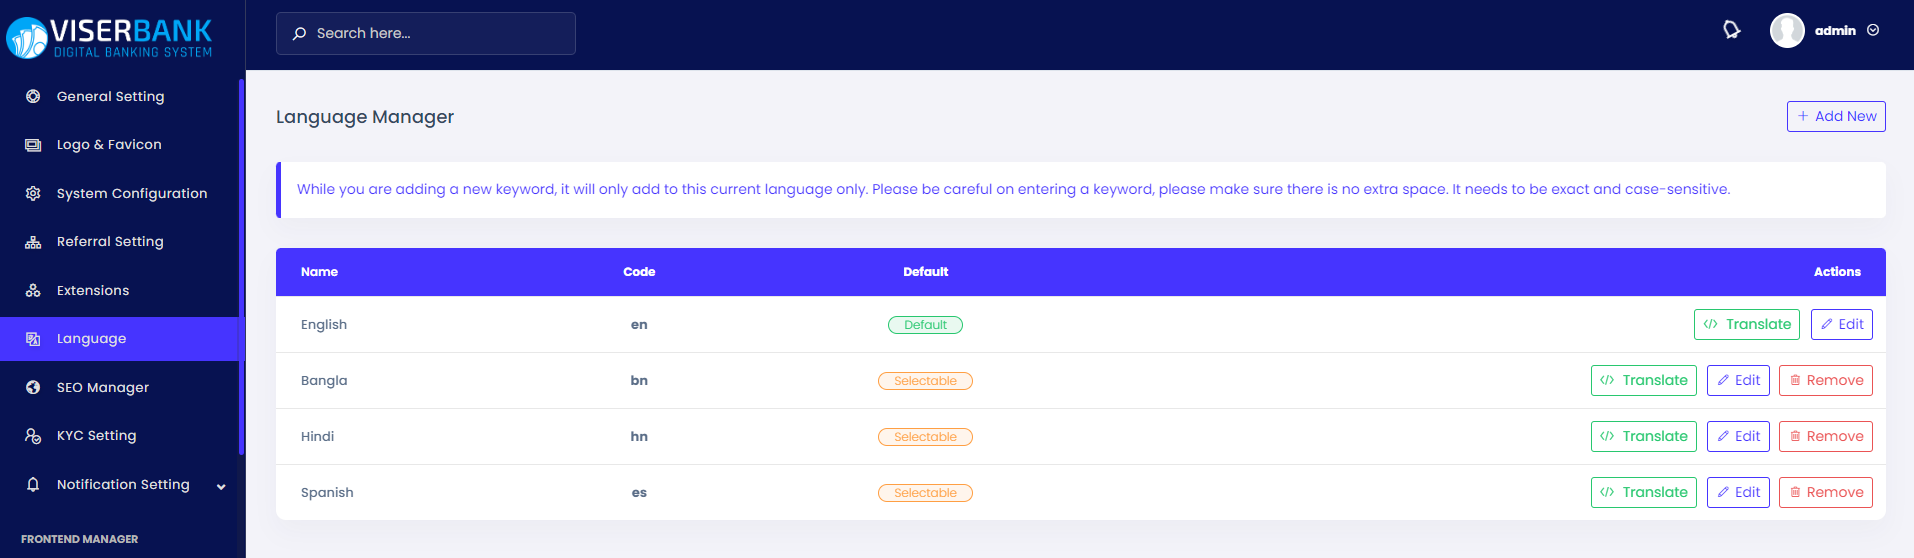
Add Keywords: Admin need to add the words/sentences as the system has. After clicking on the Add New Keyword button a pop window wll open and put the english word/sentence in the key field and add put the translated text on the value.
Edit Keywords: Admin is able to update the translated text of a keyword.
Import Keywords: Admin can import keywords from one language to another language. If you import keywords from another language then previous keywords and translated text will be removed.
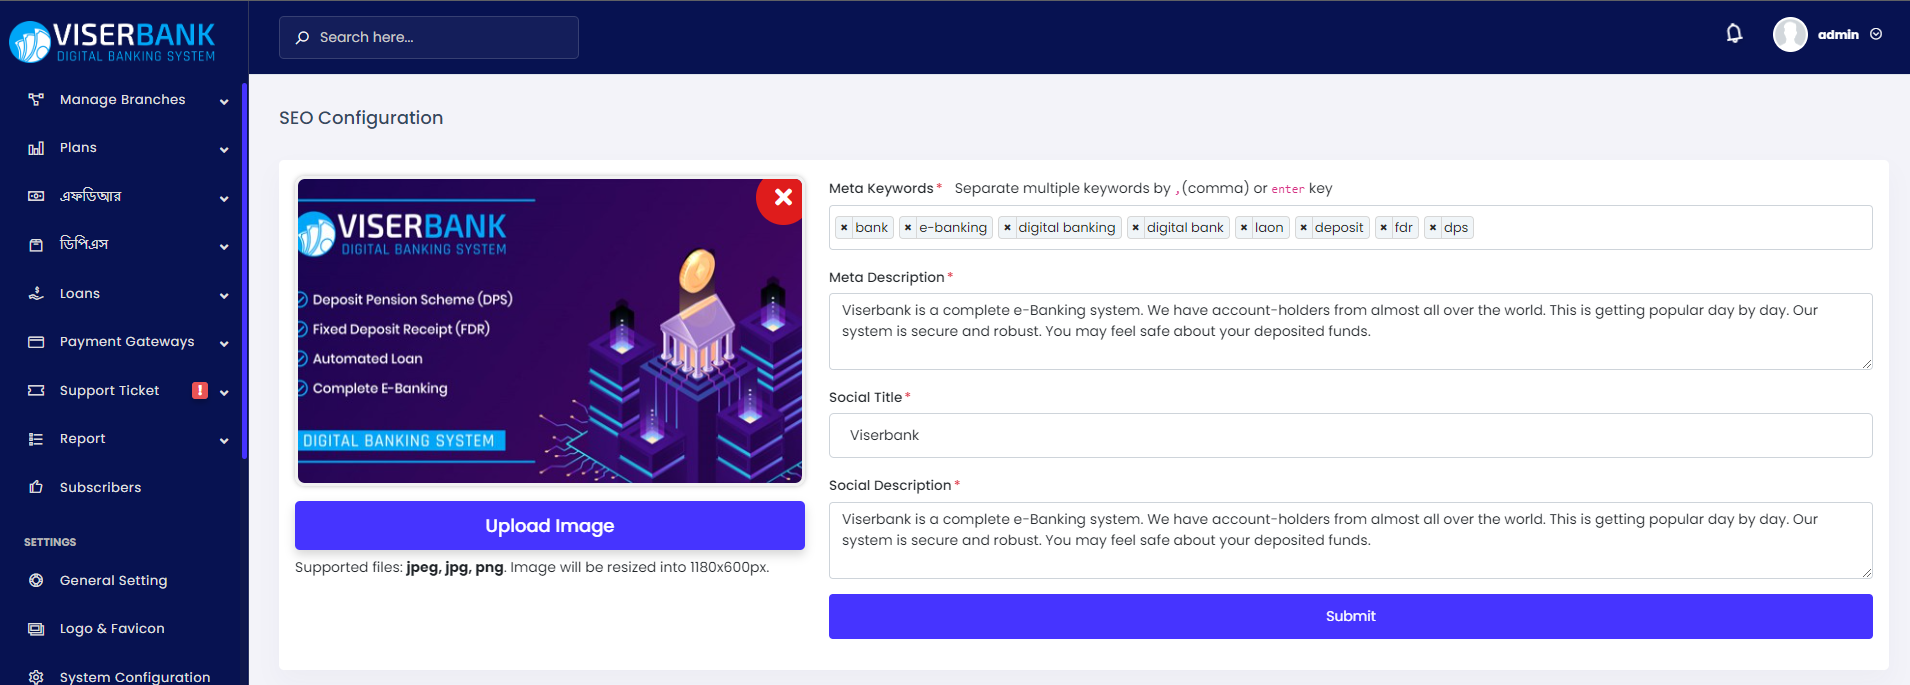
You can add seo contents from the SEO Manager menu.
Meta Keywords: Meta keywords are meta tags that you can use to give search engines more information about a page's content. They're found in a webpage's HTML source code, and are not visible to visitors.
Meta Description: A meta description tag generally informs and interests users with a short, relevant summary of what a particular page is about.
Social Title: The social title is how you define your content's title.
Social Description: This description controls how the link will be described when it shows up in someone's feed.
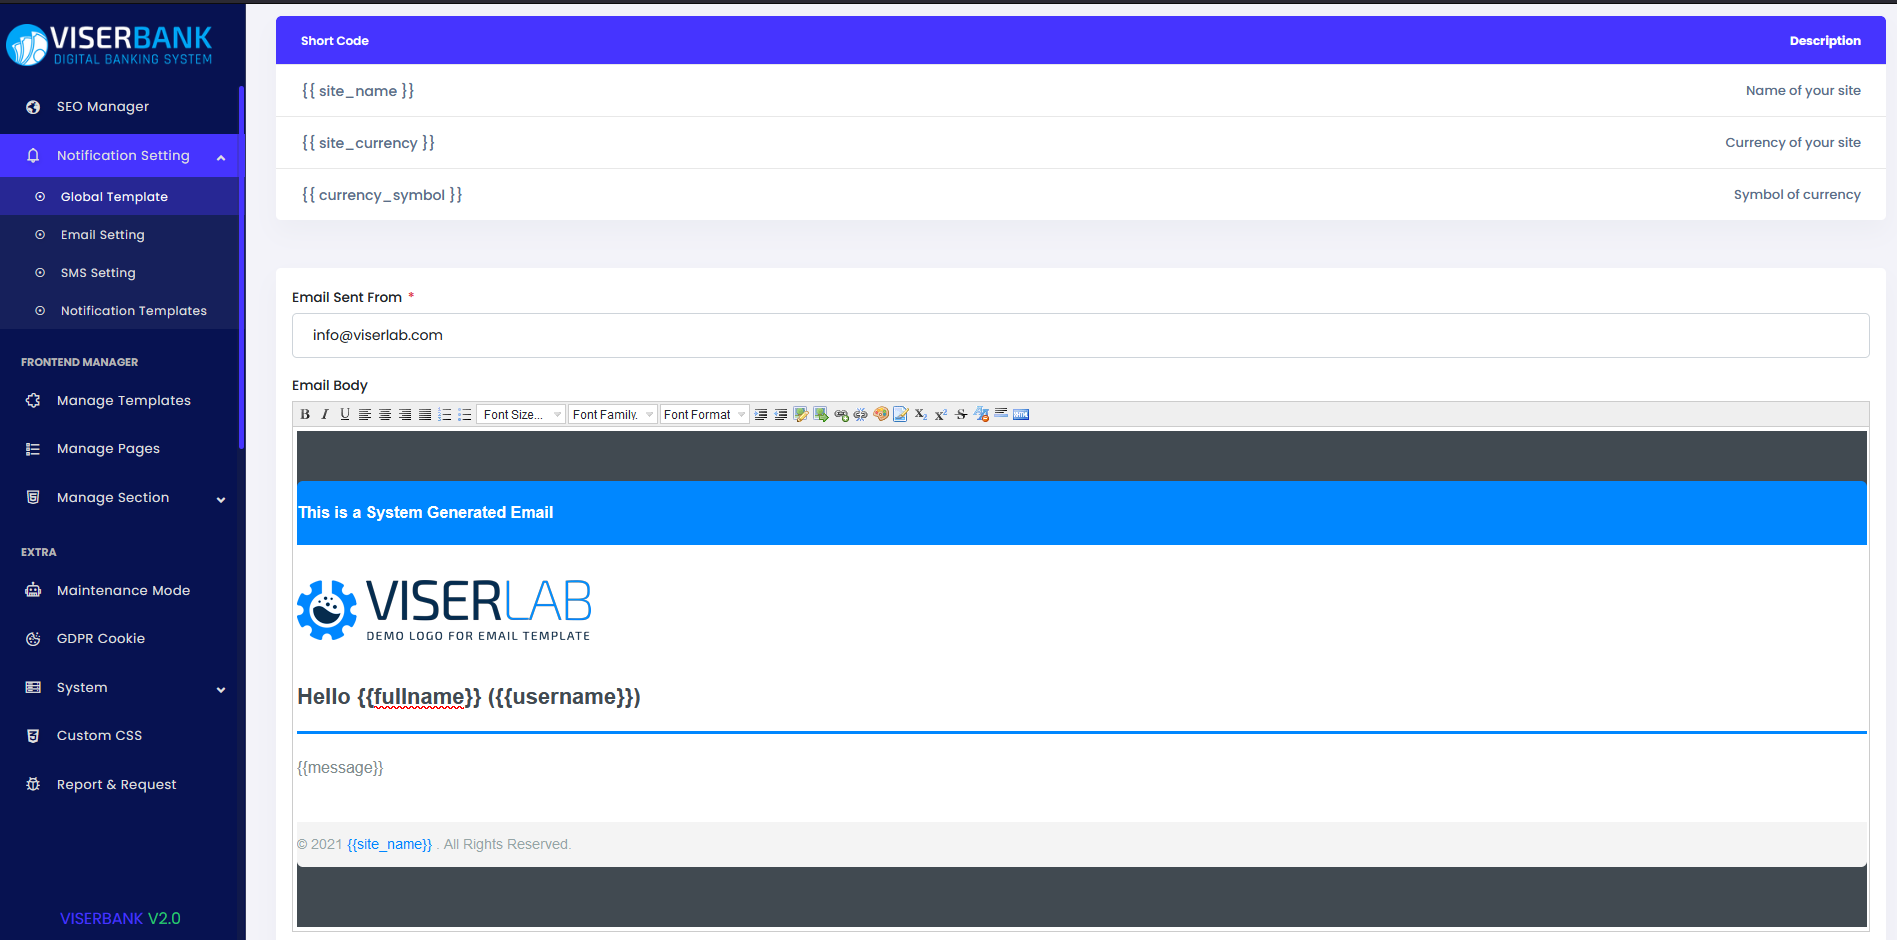
Global Template is the template for all email. From the Global Template, the admin is able to update the email template. We have provided a template as a demo.
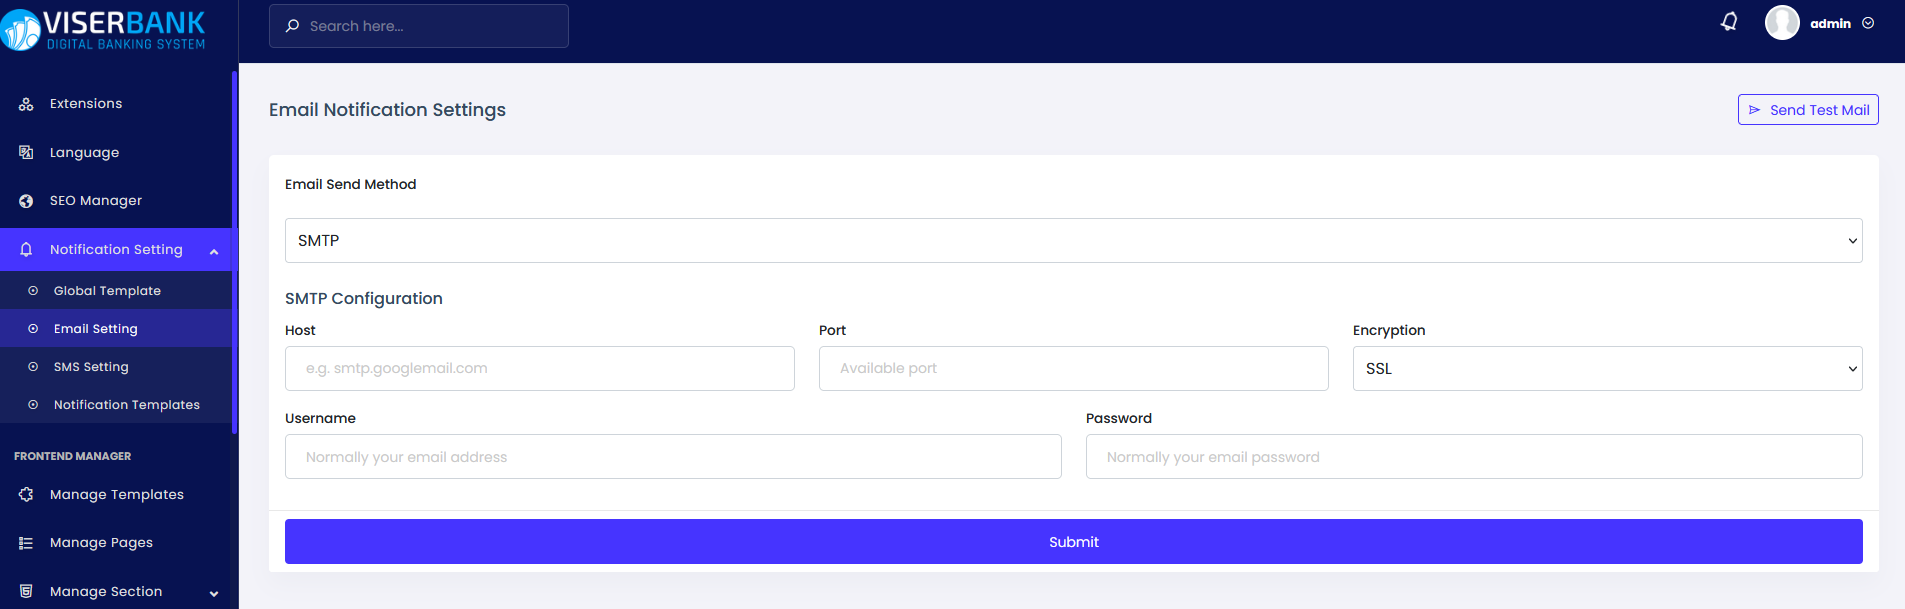
From the Email Setting menu, the admin can configure the email sending method. We have several email-sending methods like PHP Mail, SMTP, SendGrid API, and Mailjet API.
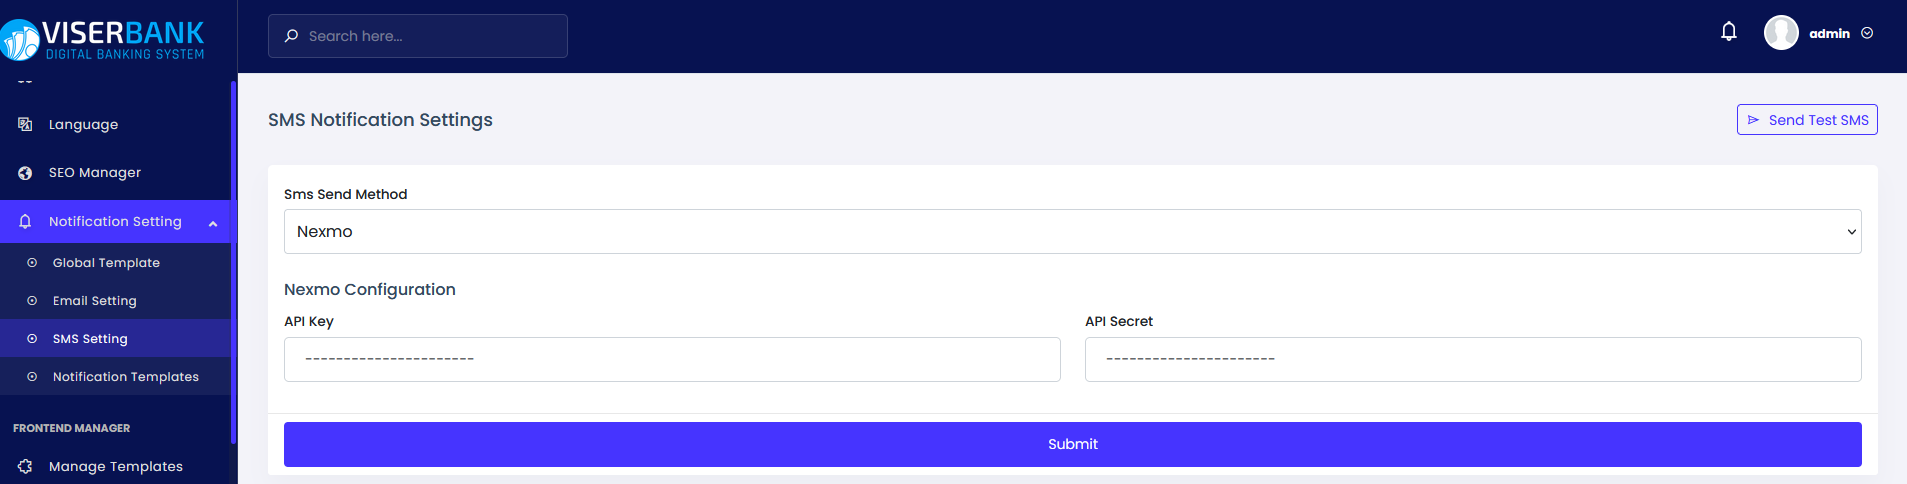
From the SMS Setting menu, the admin can configure the SMS sending method. We have several SMS sending methods like Clickatell, Infobip, Message Bird, Nexmo, Sms Broadcast, Twilio, Text Magic, and Custom API.
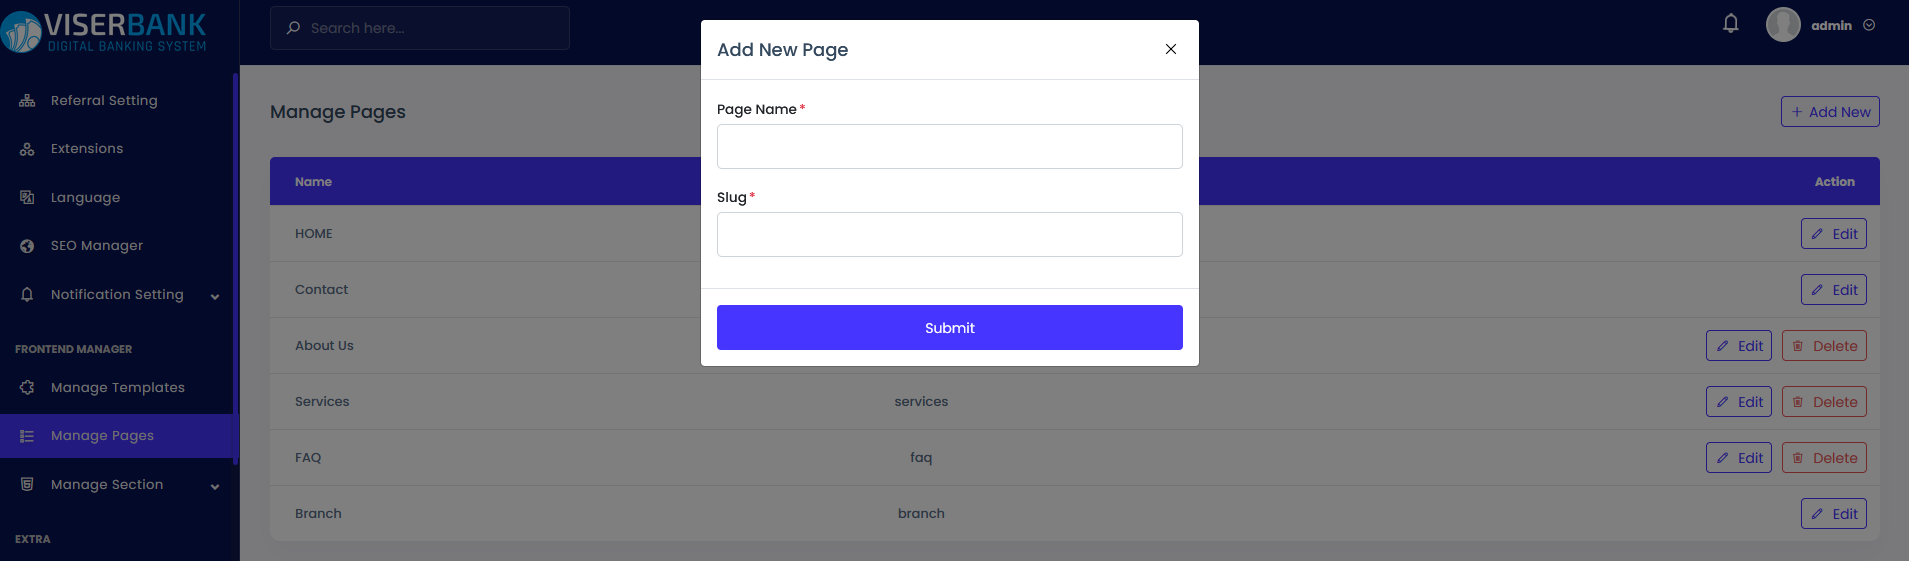
Admin can add more pages as he wants. For example, admin wants to add a new About Us page then he/she needs to provide the page name as About Us and the slug as about-us.
Admin can add/remove sections from pages by clicking on the Edit button of that page. Admin is able to move the position of the section and set the position of a section where to be placed in the website/frontend.
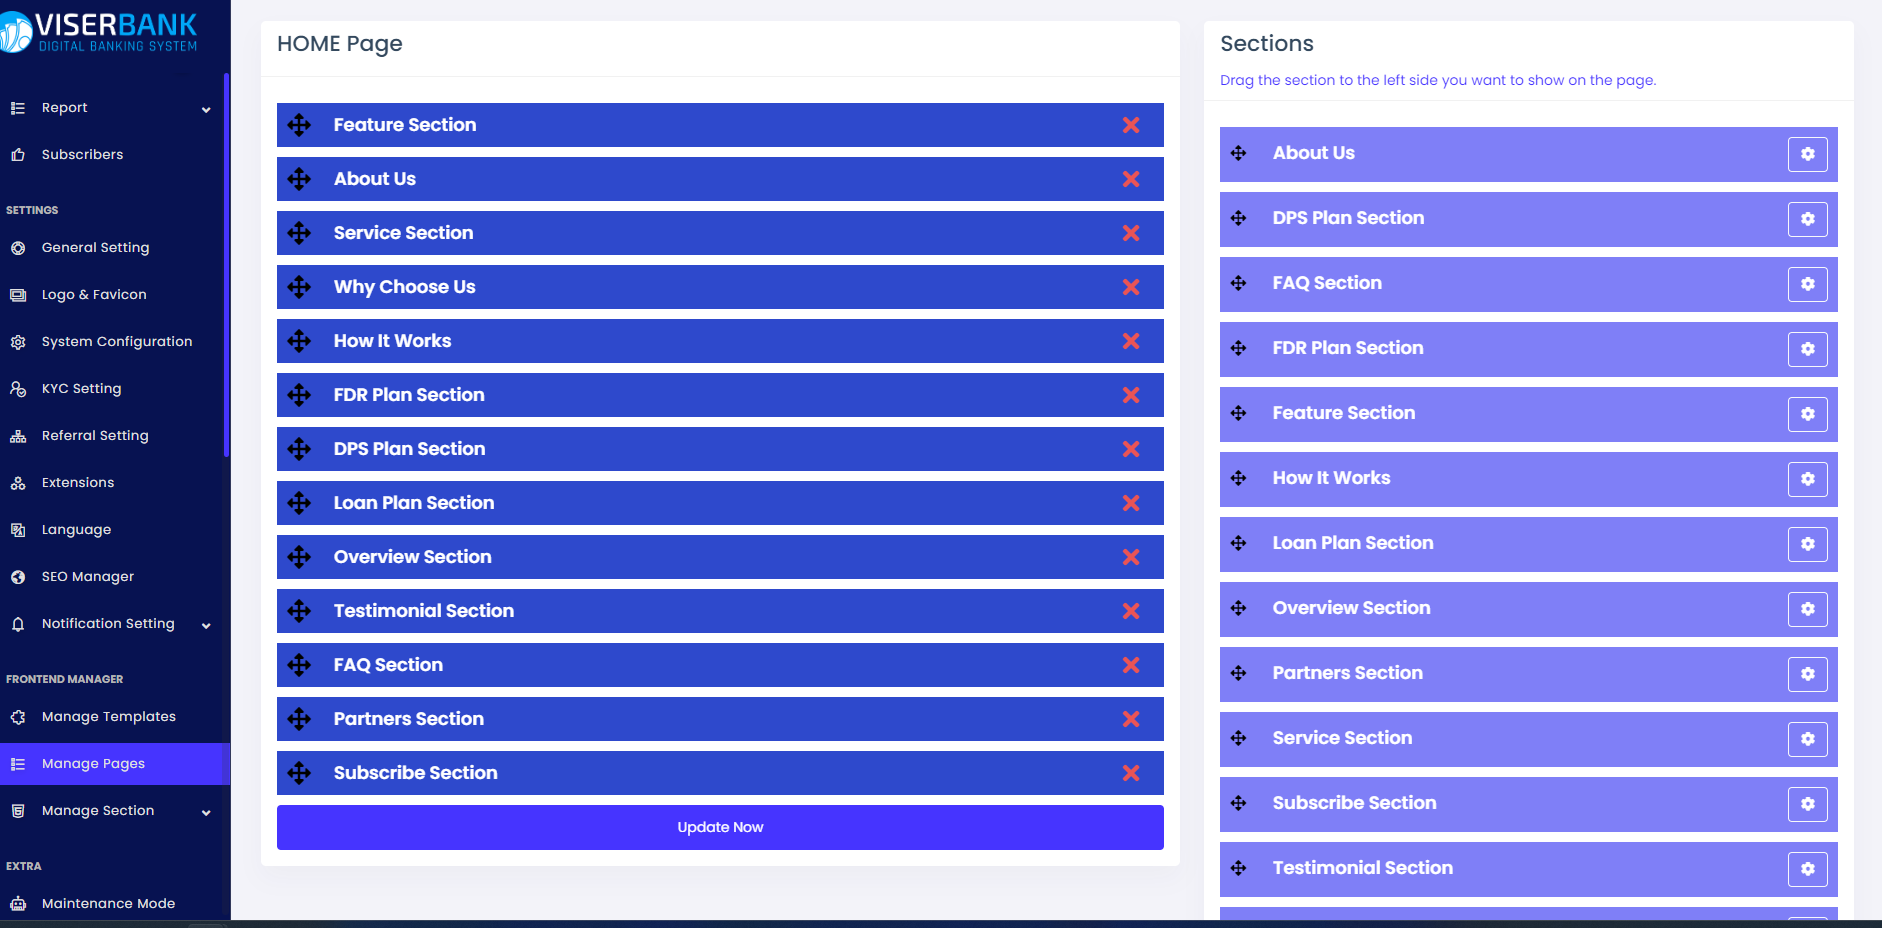
All pages in the website/frontend have several sections and sections contain content like text, images, and icons. Admin is able to add/update the contents from this menu.